

- Why Use Maintenance Mode?
- Methods to Put WordPress in Maintenance Mode
- Using a Plugin to Enable Maintenance Mode
- Manually Enabling Maintenance Mode
- Best Practices for Maintenance Mode
- Customizing Your Maintenance Mode Page
- Troubleshooting Common Issues
- Wrapping Up: The Importance of Maintenance Mode
As a developer or an agency owner, you probably understand the importance of keeping your WordPress sites running smoothly, especially during times when you need to make significant changes or updates to your site without disrupting the user experience. This is where you may need to know how to put WordPress in maintenance mode. In this comprehensive guide, we’ll explore the various methods used to enable maintenance mode, ensuring your site remains professional even during updates.
Why Use Maintenance Mode?
As a developer or site owner, your time is valuable, and maintaining a WordPress site is crucial for its performance and security. To put WordPress in maintenance mode is an essential practice that offers several key benefits:
- Prevent User Frustration: When updating plugins, themes, or the WordPress core, users might encounter errors or incomplete pages. Maintenance mode provides a professional buffer, avoiding potential confusion or frustration.
- Protect Site Integrity: Working on a live site increases the risk of errors that can affect user experience or even compromise security. Maintenance mode ensures that changes are only visible once they’re complete and tested.
- Demonstrate Professionalism: A well-designed maintenance page shows visitors that you’re actively improving their experience and you care about the quality of your site.
Maintenance mode is particularly useful for:
- Major updates or theme changes
- Database modifications
- Plugin conflict resolution
- Security enhancements
- Website redesign
- Content overhaul
- Server migration
You create a controlled environment for these critical tasks by enabling maintenance mode. It’s a professional way to manage necessary downtime, communicate with your audience, and maintain your site’s reputation. Remember, a thoughtfully implemented maintenance mode can transform potential user frustration into an opportunity to showcase your commitment to providing a quality website experience.
WordPress maintenance plans
WordPress Maintenance Plans ensure site security, performance, and uptime. Choose custom plans with backups, monitoring, and unlimited content edits.
Methods to Put WordPress in Maintenance Mode
There are primarily two ways to put WordPress in maintenance mode:
- Using a plugin
- Manually adding code
Let’s explore both methods in detail.
Using a Plugin to Enable Maintenance Mode
For those who prefer a quick and user-friendly approach, using a plugin is the way to go. Here’s how you can put WordPress in maintenance mode using a plugin:
- Log in to your WordPress dashboard

- Go to Plugins > Add New
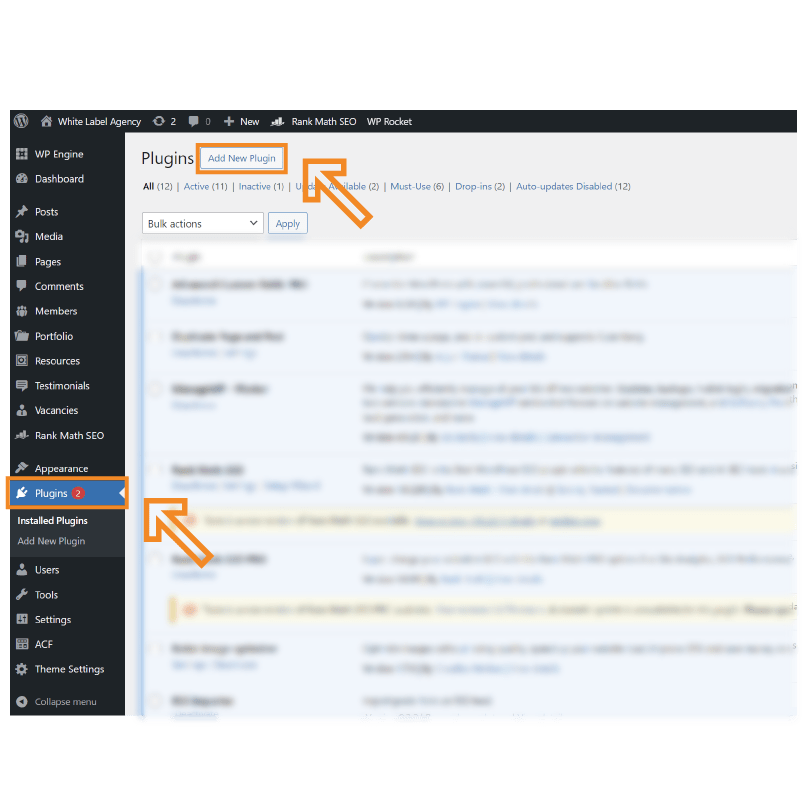
- Search for “maintenance mode” in the plugin repository
- Choose a well-rated plugin like “LightStart” or “Coming Soon Page & Maintenance Mode by SeedProd“

- Install and activate the chosen plugin
- Configure the plugin settings:
- Enable maintenance mode
- Set a custom message for visitors
- Choose a theme or design for the maintenance page
- Specify which user roles can access the site during maintenance
- Set up email capture forms if needed
- Configure social media links
- Save your settings and test the maintenance mode page
Using a plugin offers flexibility and ease of use, especially for those who aren’t comfortable with code manipulation. It’s also a great option when you need to put WordPress in maintenance mode quickly and don’t have the time for custom coding.
Manually Enabling Maintenance Mode
For developers who prefer more control or want to avoid adding another plugin, manually enabling maintenance mode is an excellent option. Here’s a detailed, step-by-step guide on how to put WordPress in maintenance mode using custom code:
- Create a
maintenance.phpFile: First, you need to create a new file calledmaintenance.phpand add it to your theme directory. This file will contain the HTML for your custom maintenance page.

This code sets up a simple, styled maintenance page. The PHP headers at the top tell browsers and search engines that the site is temporarily unavailable and to check back in an hour (3600 seconds).
- Add Code to
wp-config.php: To activate maintenance mode, you’ll need to add a snippet of code to yourwp-config.phpfile. This file is located in your WordPress root directory.
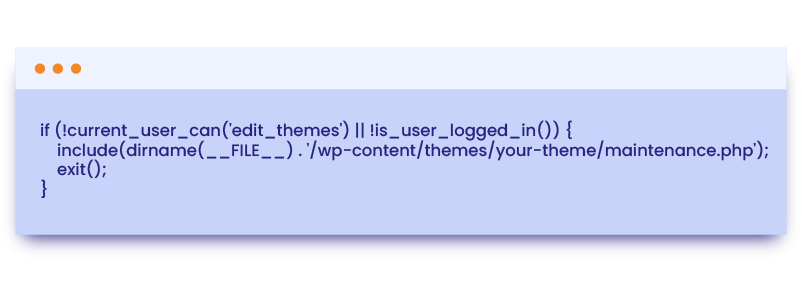
This code checks if the current user is logged in and has the ability to edit themes. If not, it displays the maintenance page. Replace your-theme with the name of your active theme directory.
- Upload the Files: Once you have created the
maintenance.phpfile and updated yourwp-config.phpfile, upload them to your server using an FTP client.
- Upload
maintenance.phpto your theme directory (usually /wp-content/themes/your-theme/) - Replace the existing
wp-config.phpin your WordPress root directory with your updated version
By following these steps, you’ll put WordPress in maintenance mode using custom code. This method gives you complete control over the appearance and functionality of the maintenance mode page.
To deactivate maintenance mode, simply remove or comment out the code you added to wp-config.php.
This approach is particularly useful when you need to put WordPress in maintenance mode for extended periods or you require custom functionality not available in plugins. It also ensures that logged-in users with appropriate permissions can still access the site, allowing you to work on it while it’s in maintenance mode.
Best Practices for Maintenance Mode
When you put WordPress in maintenance mode, consider these best practices:
- Keep it brief: Aim to complete your maintenance tasks quickly to minimize downtime.
- Provide information: Let visitors know when the site will be back online.
- Brand consistency: Ensure your maintenance page aligns with your brand’s look and feel.
- SEO considerations: Use a 503 status code to prevent search engines from indexing your maintenance page.
- Test thoroughly: Before enabling maintenance mode, test all changes in a staging environment.
- Communicate with stakeholders: Inform team members and clients about the maintenance schedule.
- Monitor analytics: Keep an eye on your site’s metrics during maintenance to catch any issues quickly.
WordPress Development Agency
Experience WordPress development with our custom-coded websites. Perfect for agencies, our reliable service ensures timely delivery and client satisfaction.
Customizing Your Maintenance Mode Page
When you put WordPress in maintenance mode, it’s important to create a maintenance page that aligns with your brand and provides value to your visitors. Here are some tips for customizing your maintenance mode page:
- Use your brand colors and logo: Maintain brand consistency even during downtime.
- Add a countdown timer: If possible, let visitors know when the site will be back online.
- Provide alternative contact methods: Include email addresses or social media links for urgent inquiries.
- Offer valuable content: Consider adding links to your blog posts or resources that visitors can access while waiting.
- Implement an email capture form: Use this opportunity to grow your mailing list.
- Add social sharing buttons: Encourage visitors to share your content even when the main site is down.
- Optimize for mobile: Ensure your maintenance page looks good on all devices.
Troubleshooting Common Issues
Even when you properly put WordPress in maintenance mode, you might encounter some issues. Here are some common problems and their solutions:
- Stuck in maintenance mode: If your site is stuck, delete the
.maintenancefile in your WordPress root directory. - Plugin conflicts: Disable all plugins and re-enable them one by one to identify conflicts.
- Theme incompatibility: Switch to a default WordPress theme temporarily to isolate theme-related issues.
- Caching problems: Clear your browser and server caches after disabling maintenance mode.
- Redirect loops: Check your .htaccess file for conflicting redirect rules.
- White screen of death: Enable WordPress debug mode to identify PHP errors causing the issue.
Wrapping Up: The Importance of Maintenance Mode
Knowing how to put WordPress in maintenance mode is an essential skill for any WordPress developer or agency owner. Whether you choose to use a plugin or manually add code, ensuring your site remains professional during updates is crucial for maintaining client trust and user experience.
Remember, the three keys to successful maintenance are planning, quick execution, and thorough testing. By following the methods and best practices outlined in this guide, you’ll be well-equipped to handle any maintenance tasks your WordPress sites may require.
As you become more comfortable with putting WordPress in maintenance mode, you’ll find that it’s an invaluable tool for managing your sites effectively. It allows you to perform necessary updates and improvements while maintaining a professional appearance and keeping your visitors informed.
If you need further assistance with WordPress maintenance or development, don’t hesitate to reach out to our team of experts. We’re here to help you keep your WordPress sites running smoothly and efficiently, ensuring that every time you need to put WordPress in maintenance mode, the process is seamless and stress-free.


