- Understanding the WordPress Customizer
- Creating a Child Theme for Safe Customization
- Customizing Theme Layouts
- Customizing with Plugins: Expanding Functionality
- Adding Custom CSS for Advanced Customization
- Editing Theme Files Directly
- Customizing for Mobile Responsiveness
- Troubleshooting Common Theme Customization Issues
- Conclusion
- FAQs
Customizing your WordPress theme is essential for establishing a strong brand identity, improving user experience, and enhancing SEO performance. A well-designed website not only makes a lasting impression but also ensures better engagement and functionality. Understanding how to customize a WordPress theme allows you to tailor your site’s appearance and features to match your needs.
There are multiple ways to approach WordPress theme customization. No-code methods rely on the built-in WordPress Customizer and page builders like Elementor, while low-code techniques involve small CSS tweaks. For those with advanced skills, modifying theme files and using a child theme provides deeper WordPress customization options.
The best time to customize WordPress theme is after defining your content strategy, during a rebranding process, or before launching a new website. This guide will walk you through how to customize WordPress theme efficiently, helping you achieve a unique and professional website without compromising performance.
Understanding the WordPress Customizer
The WordPress Customizer is the simplest way to modify your theme’s appearance without touching code. It offers a user-friendly interface where you can tweak site identity, layout, colors, typography, and more while seeing the changes in real-time. Unlike manually editing theme files, this tool allows you to experiment with different design elements without the risk of breaking your website.
7 Key Features of the WordPress Customizer

The WordPress Customizer is accessible through Appearance > Customize in your WordPress dashboard. Once opened, it provides a structured panel with various options to modify your site.
- Site Identity – This section lets you upload a logo, set a site title, and add a tagline. A favicon (site icon) can also be uploaded to enhance brand recognition.
- Colors and Background – Modify the theme’s primary color scheme, including background and text colors, to match your branding. Some themes allow full control over individual elements like buttons and headers.
- Fonts and Typography – Adjust font families, sizes, and weights for better readability and aesthetics. Many themes provide built-in typography controls, while others may require additional plugins for more customization.
- Menu Customization – Add, remove, or reorganize navigation menus to improve website structure and usability. Proper navigation ensures visitors can find content easily.
- Widgets and Sidebars – Widgets allow you to add social media icons, recent posts, search bars, or contact forms to different sections of your site. The Customizer provides a drag-and-drop interface to place them in sidebars or footers.
- Homepage Settings – Choose whether your homepage displays a static page (ideal for business websites) or a dynamic blog feed (great for bloggers and content-driven sites).
- Additional CSS – For advanced users, this section allows custom styling without modifying theme files. You can fine-tune spacing, typography, and visual effects by adding CSS code.
Projects
Outsource WordPress projects with confidence. We provide fixed-price white-label development and dedicated management with no upfront payment.
How to Use the WordPress Customizer Effectively
To start customizing your theme, follow these steps:
- Log in to your WordPress dashboard and navigate to Appearance > Customize.
- Use the left-hand panel to adjust site identity, colors, menus, and other settings.
- View the live preview on the right side of the screen as you make changes.
- Once satisfied, click Publish to apply the modifications.
Since changes in the WordPress Customizer happen in real-time, you can see how different design elements work together before making them live. However, if you’re making significant adjustments, it’s best to test them in a staging environment before applying them to your live site.
How to Preview Changes Without Going Live
If you’re hesitant about making changes directly on your live website, you can take advantage of WordPress’s Live Preview feature. This allows you to test different WordPress theme design settings before committing to them. Additionally, using a staging environment—a private copy of your website—ensures that any adjustments are properly reviewed before going live. Plugins like WP Staging or your hosting provider’s staging feature can help you set this up.
Creating a Child Theme for Safe Customization
While the WordPress Customizer offers a convenient way to modify your theme, deeper changes—such as editing theme files—require a more structured approach. One of the best ways to ensure your WordPress customizations remain intact after theme updates is by using a child theme.
What Is a Child Theme and Why Do You Need One?
A child theme is a separate theme that inherits the styling and functionality of a parent theme while allowing you to make customizations without modifying the original files. This is crucial because when a theme update is released, any changes made directly to the parent theme’s files will be lost. By using a child theme, you can:
- Preserve customizations – Updates to the parent theme won’t override your changes.
- Ensure better organization – Custom CSS, PHP functions, and template edits remain separate from the core theme files.
- Safeguard your website – If something goes wrong with customization, you can always revert to the parent theme.
How to Create a Child Theme
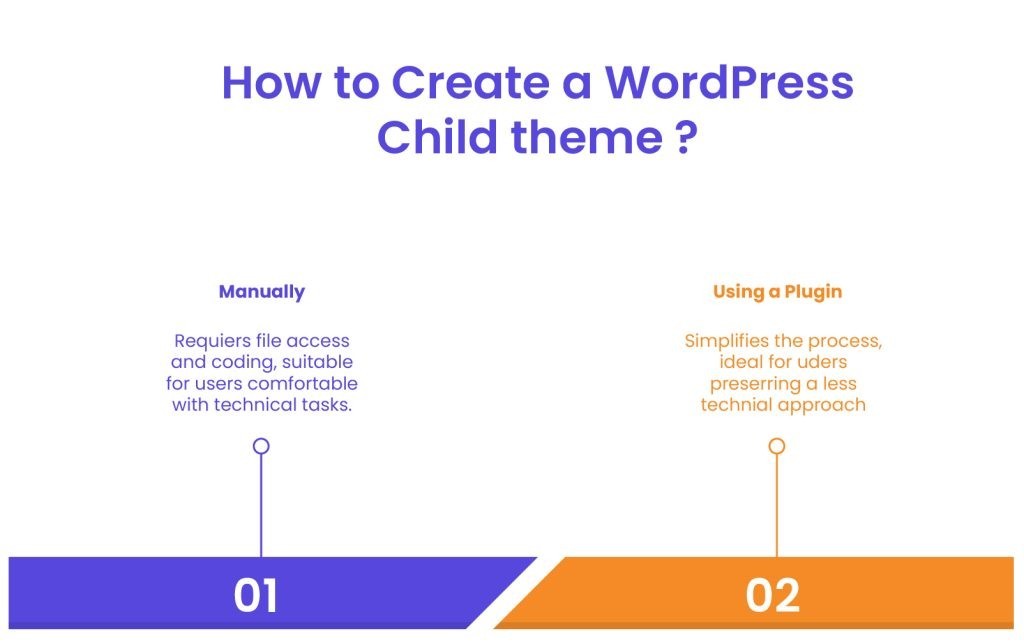
There are two ways to create a child theme: manually or using a plugin.
Method 1: Manually Creating a Child Theme
- Access Your Website Files
- Use an FTP client (like FileZilla) or your hosting provider’s file manager.
- Navigate to wp-content/themes/.
- Create a New Child Theme Folder
- Inside the themes directory, create a new folder and name it appropriately (e.g.,
yourtheme-child).
- Inside the themes directory, create a new folder and name it appropriately (e.g.,
- Create a
style.cssFile- Inside the new folder, create a
style.cssfile and add the following code:
- Inside the new folder, create a
CSS
/*
Theme Name: Your Theme Child
Template: yourtheme
Author: Your Name
Description: A child theme for Your Theme
Version: 1.0
*/
- Ensure that the Template field matches the exact folder name of the parent theme.
- Create a functions.php File
- In the same folder, create a functions.php file and add this code to properly enqueue the parent theme’s styles:
PHP
<?php
function child_theme_enqueue_styles() {
 wp_enqueue_style('parent-style', get_template_directory_uri() . '/style.css');
}
add_action('wp_enqueue_scripts', 'child_theme_enqueue_styles');
?>
- Activate the Child Theme
- Go to your WordPress dashboard > Appearance > Themes and activate the newly created child theme.
Method 2: Using a Plugin to Create a Child Theme
If you’re not comfortable working with files, you can use plugins like Child Theme Configurator to generate a child theme automatically. These plugins simplify the process and ensure proper setup.
If you want to dive deeper, you can learn more about how to make a child theme in WordPress in our comprehensive guide.
3 Common Mistakes When Setting Up a Child Theme
- Incorrect parent theme folder name – If the Template field in style.css doesn’t match the exact name of the parent theme folder, the child theme won’t work.
- Forgetting to enqueue parent styles – Without the correct functions.php code, your child theme might appear broken.
- Editing files in the wrong theme – Always confirm that you’re modifying the child theme, not the parent theme.
Pro Tip: How to Avoid Losing Changes During Theme Updates
Even with a child theme, it’s good practice to keep backups of WordPress customizations. Using a plugin like WP Rollback can help you revert theme updates if anything goes wrong. Additionally, keeping a copy of your child theme files ensures you can restore changes if needed.
Customizing Theme Layouts

Once your child theme is set up, you can begin customizing the structure and layout of your WordPress theme. Adjusting layouts allows you to define how different pages, posts, and sections of your site appear to visitors.
Customizing Your Homepage Layout
The homepage is often the first thing visitors see, so designing it effectively is crucial. WordPress provides two main homepage options:
- A dynamic blog feed – Displays your latest posts in chronological order. Ideal for bloggers and news websites.
- A static homepage – Uses a custom page as the main landing page. Best for business websites, portfolios, or service-based sites.
To set a static homepage:
- Navigate to Settings > Reading in your WordPress dashboard.
- Select A static page and choose a custom page for your homepage.
- Assign a different page for your blog posts if needed.
Modifying Page and Post Layouts
Most WordPress themes provide different layout options for pages and posts. You can often choose between:
- Full-width layout – Ideal for landing pages, portfolios, or sales pages.
- Sidebar layout – Useful for blogs and magazine-style websites.
- Grid layout – Displays posts in a structured, visually appealing format.
To change layouts:
- Edit a page or post in WordPress.
- Look for the Page Attributes or Template option in the right-hand panel.
- Choose the desired layout and update the page.
For more control, WordPress theme customization can be enhanced with page builders like Elementor or Beaver Builder, which allow drag-and-drop editing of page layouts.
Customizing Archive Pages
Archive pages display collections of posts, such as:
- Category pages – Show posts grouped by a specific topic.
- Tag pages – Organize posts based on shared keywords.
- Author pages – Display all posts by a specific writer.
To modify these layouts, you can:
- Use your theme’s settings (some premium themes allow layout customization).
- Edit
archive.phpin your child theme to create custom archive designs. - Use a plugin like Content Views to build custom archive page layouts.
Customizing the Header and Footer
Headers and footers play an essential role in navigation and branding. Many themes provide built-in header/footer settings, but if you want deeper WordPress customization:
- Edit via the WordPress Customizer – Go to Appearance > Customize > Header/Footer and modify elements like the logo, menu, and colors.
- Use a page builder – Elementor Pro and other page builders allow full control over header and footer layouts.
- Manually edit theme files – Advanced users can modify
header.phpandfooter.phpwithin the child theme to make structural changes.
Pro Tip: How to Use Block Themes and Full Site Editing (FSE) in WordPress 5.9+
If you’re using a block-based theme, WordPress’s Full Site Editing (FSE) feature allows direct customization of theme templates using the block editor. This eliminates the need for manual file edits, making it easier to design layouts visually. To access this:
- Navigate to Appearance > Editor (available in block themes).
- Modify headers, footers, and page templates directly using blocks.
- Save changes to apply them across your site.
With proper WordPress theme customization, you can create layouts that match your brand, improve user experience, and enhance functionality. Next, we’ll explore how to expand your theme’s capabilities using plugins.
Customizing with Plugins: Expanding Functionality
One of the main benefits of WordPress is its ability to extend functionality through plugins. When customizing your WordPress theme, plugins are a powerful tool that allows you to add new features, optimize performance, and enhance WordPress theme design elements without needing to touch the core theme files.
Using Page Builder Plugins for Drag-and-Drop Customization
Page builder plugins simplify the process of designing layouts by providing a drag-and-drop interface. Here’s how page builders can enhance your customization process:
- Design Flexibility – Page builders allow you to create unique page layouts, including complex structures like multi-column grids, full-width sections, and custom headers/footers.
- Real-Time Editing – Most page builders provide a live preview of your changes, so you can see how the layout will look once published.
- No Coding Required – Unlike traditional theme customization, which often requires knowledge of HTML, CSS, or PHP, page builders let you customize WordPress theme design visually.
- Wide Range of Widgets – Page builders often come with built-in widgets like sliders, buttons, forms, and image galleries that you can drag directly onto your page, further expanding the functionality of your theme.
By using a page builder, you gain full control over the design without having to dive into complicated code. These tools are perfect for users who want to customize their themes but don’t have advanced programming skills.
5 Essential Plugins for WordPress Theme Customization

Several plugins are specifically designed to assist with WordPress theme customization. These plugins allow you to modify layouts, add advanced features, and even speed up your site without requiring coding knowledge. Some of the most popular plugins include:
- Elementor – A leading page builder that provides a drag-and-drop editor to create custom layouts. Whether you need a landing page, blog design, or full website overhaul, Elementor lets you design everything without writing code.
- Beaver Builder – Another page builder plugin that works similarly to Elementor but offers a more intuitive interface. It’s especially user-friendly for beginners and provides powerful WordPress customization options.
- WPForms – A user-friendly form plugin that lets you easily create contact forms, surveys, and more without needing to code.
- WooCommerce – If you’re running an eCommerce site, this plugin is essential. It integrates seamlessly with most themes, allowing you to add an online store to your site.
- Jetpack – A multipurpose plugin that adds several features to improve your site’s performance, security, and design. Jetpack includes tools for social sharing, image optimization, and more.
These plugins not only improve site functionality but also give you greater design control without needing advanced technical skills. Whether you’re working with a simple blog theme or a complex business website, plugins provide the flexibility to extend your theme’s capabilities.
WordPress theme development
Enhance your agency’s offerings with our expert WordPress theme development services. Custom-coded themes designed to meet your clients’ needs.
Using Widgets to Add New Functionality
We briefly mentioned widgets above. But what are they? Widgets are a great way to better customize WordPress theme and extend its functionality. Widgets are small blocks of content that can be added to various areas of your website, such as sidebars, footers, or headers. Common widgets include:
- Social Media Links – Add icons for Facebook, Twitter, Instagram, and other social platforms to make your site more interactive.
- Recent Posts – Display a list of your latest posts in a sidebar or footer area.
- Search Bar – Make it easier for users to navigate your site by adding a search bar in a prominent location.
- Contact Forms – Use plugins like the above-recommended WPForms to add contact forms to your theme without any coding.
To add widgets, go to the Appearance > Widgets section in the WordPress dashboard. Here, you can drag and drop different widgets into available areas, such as your sidebar or footer. Many themes also support custom widget areas, giving you even more flexibility to display dynamic content.
Pro Tip: Plugins That Enhance Theme Design Without Slowing Down Your Site
While plugins can add great functionality, it’s essential to be mindful of site performance. Some plugins can slow down your website if they’re too heavy or poorly coded. To keep your site running smoothly, try these tips:
- Choose lightweight plugins – Look for plugins with good reviews and a solid track record of performance.
- Use caching plugins – Plugins like WP Super Cache and W3 Total Cache help improve site speed by caching static content.
- Test your site’s performance – Tools like Google PageSpeed Insights or GTmetrix can help you identify performance issues and find plugins that might be slowing your site down.
Adding Custom CSS for Advanced Customization
For users who want even more control over their WordPress theme customization, adding custom CSS is an effective way to style elements exactly the way you want them. CSS (Cascading Style Sheets) controls the look and feel of your website, from font sizes and colors to margins and spacing. While the WordPress Customizer offers an option to add custom CSS, knowing how to write and apply your own CSS can elevate your WordPress theme design.
Overview of CSS Basics
CSS is the language used to style the visual elements of a website. It allows you to control the layout, colors, fonts, and responsiveness of your WordPress site. Understanding the basics of CSS can help you make precise adjustments to your theme.
CSS works by selecting HTML elements and applying style rules. A simple example might look like this:
CSS
h1 {
font-size: 32px;
color: #333333;
}
In this example, the h1 tag is selected, and the font size and color are applied to any text inside an h1 tag. CSS selectors, properties, and values are the core components of CSS, and once you understand these, you can start customizing your WordPress theme more effectively.
How to Add Custom CSS Using the WordPress Customizer

You don’t need to edit your theme files directly to add custom CSS. WordPress provides a built-in method through the Customizer:
- Go to Appearance > Customize in your WordPress dashboard.
- Click on Additional CSS at the bottom of the panel.
- Enter your custom CSS code in the text box and see the changes reflected in the live preview.
- Once satisfied, click Publish to apply the changes.
This method is simple and effective for users who want to tweak individual elements like font size, colors, and spacing.
Inspecting and Targeting Theme Elements Using Browser Developer Tools
To make precise CSS adjustments, it’s helpful to identify the specific elements on your site that you want to style. The browser developer tools (available in Chrome, Firefox, and other modern browsers) allow you to inspect HTML elements and find the exact CSS selectors you need. Here’s how to use it:
- Right-click on any element of your website and select Inspect or Inspect Element.
- The browser’s developer tools will open, highlighting the selected element and showing its HTML structure.
- From here, you can view the associated CSS styles and experiment with changes in real-time.
This feature is invaluable for identifying which selectors to target in your custom CSS for fine-tuning the design.
Pro Tip: Plugins That Enhance Theme Design Without Slowing Down Your Site
If you’re making advanced changes to your theme, consider using a CSS preprocessor like Sass (SCSS). SCSS allows for more organized, reusable, and maintainable styles. You can define variables for colors, fonts, and other properties and use nested rules to make your code cleaner. While SCSS requires a bit more technical knowledge and a build process, it can greatly improve the efficiency and flexibility of your custom CSS.
Bonus Section: Common CSS Customizations for WordPress Themes
- Fonts – Change font families, sizes, and weights to match your brand.
- Colors – Modify background, text, and link colors to create a more cohesive design.
- Spacing – Adjust margins, padding, and line heights to improve readability and layout.
CSS is a powerful tool for customizing your WordPress theme. By applying your own custom styles, you can ensure that your site not only looks unique but also functions smoothly.
WordPress Webdesign
Enhance your agency’s offerings with our WordPress website design services. Get custom, high-quality designs that fit your client’s needs.
Editing Theme Files Directly
While the WordPress Customizer, plugins, and custom CSS allow for extensive customization, there are times when deeper modifications require direct access to your theme’s core files. Editing theme files gives you full control over how your website functions and appears. However, making these changes incorrectly can break your site, so it’s essential to follow best practices.
Overview of Key Theme Files

WordPress themes consist of multiple files that control different parts of your site. Understanding which files to edit is crucial for WordPress theme customization without causing unintended issues.
- header.php – Contains the header section, including the site logo, navigation menu, and metadata. Editing this file allows you to modify the structure of your site’s header.
- footer.php – Controls the footer area of your theme. Customizing this file helps add copyright information, additional links, or custom scripts.
- functions.php – A powerful file where custom PHP code can be added. It’s commonly used to add new features, disable default theme functions, or enqueue styles and scripts.
- style.css – The primary stylesheet that controls the appearance of your theme. You can edit this file to apply custom styles, but using a child theme is highly recommended to prevent losing changes during updates.
- single.php – Controls the layout and appearance of individual blog posts. Editing this file allows you to change how post content is displayed.
- page.php – Similar to single.php, but used for static pages instead of blog posts.
- archive.php – Defines how category, tag, and author archive pages appear.
- sidebar.php – Manages the content displayed in the sidebar, such as widgets and navigation menus.
How to Safely Edit Theme Files via FTP or cPanel
If you need to modify these files, avoid using the built-in WordPress Theme Editor, as incorrect edits can cause your site to crash. Instead, follow these safer methods:
1. Editing via FTP
- Install an FTP client like FileZilla.
- Connect to your website using your hosting credentials.
- Navigate to
wp-content/themes/your-theme/. - Locate and download the file you want to edit.
- Make changes in a text editor (such as VS Code or Sublime Text).
- Upload the modified file back to your theme folder.
2. Editing via cPanel File Manager
- Log in to your hosting account and open cPanel.
- Navigate to File Manager > public_html/wp-content/themes/your-theme/.
- Locate the file you need to modify.
- Right-click and select Edit to make changes.
- Save your edits and check your website for any errors.
Understanding WordPress Hooks: Actions and Filters
If you’re adding custom functionality, you don’t always need to modify theme files directly. WordPress provides hooks—a built-in system that allows you to inject code without altering core theme files.
- Action Hooks – Allow you to execute custom code at specific points in WordPress, such as adding custom content before or after posts.
- Filter Hooks – Modify existing content, such as changing post titles, excerpts, or widget output.
Example of using an action hook in functions.php:
S
PHP
function custom_footer_text() {
echo '<p>Custom footer text added via action hook.</p>';
}
add_action('wp_footer', 'custom_footer_text');
Caution: Avoiding Errors That Can Break Your Theme
- Always back up your theme files before making any modifications.
- Check for syntax errors—a single misplaced semicolon or bracket can break your site.
- Use a staging site to test changes before applying them to your live website.
S
Pro Tip: How to Use a Child Theme When Modifying Template Files
If you’re editing template files, always copy them into your child theme before making changes. This prevents updates from overwriting your modifications. Simply:
- Copy the file (e.g.,
single.php) from the parent theme. - Paste it into the child theme folder while maintaining the same directory structure.
- Modify the copied file as needed.
By carefully modifying WordPress custom theme files, you can take full control over your site’s design and functionality while minimizing risks. Next, we’ll focus on ensuring your WordPress customizations work seamlessly on mobile devices.
Customizing for Mobile Responsiveness
With mobile traffic surpassing desktop browsing, ensuring your WordPress theme customization is fully responsive is critical. A mobile-friendly website improves user experience, reduces bounce rates, and enhances SEO rankings. If your theme isn’t automatically optimized for mobile, you’ll need to make adjustments to ensure a seamless experience across all devices.
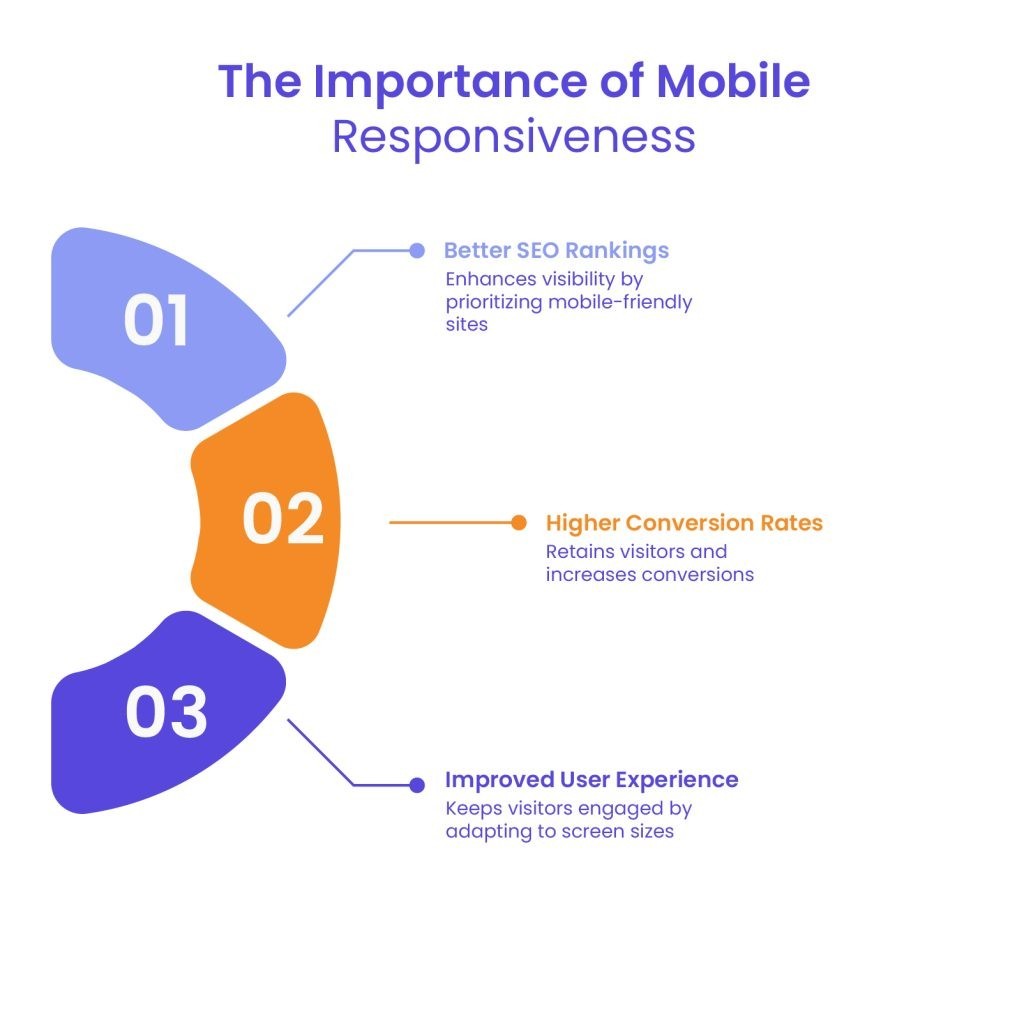
Why Mobile Responsiveness Is Important
- Better SEO Rankings – Google prioritizes mobile-friendly websites in search results, so ensuring responsiveness can boost your visibility.
- Improved User Experience – A site that adapts well to different screen sizes keeps visitors engaged and reduces frustration.
- Higher Conversion Rates – Whether you run an online store or a blog, a responsive design helps retain visitors and increases conversions.
Tools to Test Mobile Responsiveness
Before making changes, check how your website appears on different devices. Some useful tools include:
- Google Mobile-Friendly Test – Enter your URL, and Google will analyze whether your site meets mobile optimization standards.
- Chrome Developer Tools – Open your website in Chrome, right-click, and select Inspect. Click on the device icon to simulate mobile screens.
- Responsive Design Checker – Online tools like responsive design checkers allow you to preview your site on different screen sizes.
Making Adjustments in the WordPress Customizer for Mobile Layouts
The WordPress Customizer includes a mobile preview option that lets you test your design. To access it:
- Go to Appearance > Customize in your WordPress dashboard.
- Click the device preview icons (desktop, tablet, and mobile) at the bottom of the panel.
- Adjust your layout, font sizes, and spacing to ensure mobile readability.
Using CSS Media Queries for Mobile-First Design
If elements of your theme don’t display correctly on mobile, you can use CSS media queries to define styles for smaller screens. For example:
CSS
@media screen and (max-width: 768px) {
body {
font-size: 16px;
  }
.header-menu {
display: none;
  }
}
This CSS snippet adjusts font size and hides the main navigation menu when the screen width is less than 768 pixels (common for tablets and smartphones).
Optimizing Images and Elements for Mobile
Large images and complex layouts can slow down a mobile site. To ensure optimal performance:
- Use responsive images – WordPress automatically serves different image sizes for different screen resolutions. Use
srcsetfor better optimization. - Enable lazy loading – Plugins like Smush or Lazy Load by WP Rocket help delay image loading until they are visible on the screen, improving page speed.
- Avoid large fixed-width elements – Ensure elements like buttons and containers resize dynamically instead of being fixed at large dimensions.
Pro Tip: Prioritize Mobile-First Design
Instead of designing for desktop first and then adjusting for mobile, consider a mobile-first approach. Start by designing layouts for smaller screens, then progressively enhance them for larger devices. This ensures your site is optimized for the majority of users who browse on mobile.
By making your WordPress theme customization mobile-friendly, you create a better user experience, improve SEO rankings, and ensure visitors can navigate your site smoothly on any device. Next, we’ll discuss common theme customization issues and how to troubleshoot them effectively.
Troubleshooting Common Theme Customization Issues

Even with careful WordPress theme customization, you might encounter issues that affect your website’s design, functionality, or performance. Understanding common problems and how to resolve them can save time and prevent frustration.
Theme Update Overwriting Customizations
One of the most common issues occurs when a theme update erases all custom changes. If you’ve modified your theme’s core files directly, an update will replace them with new default versions.
How to Recover or Avoid This Issue
- Use a Child Theme – Always make modifications in a child theme to prevent updates from affecting your changes.
- Backup Before Updating – Use plugins like UpdraftPlus or BackupBuddy to create a full backup before updating.
- Use Custom CSS Instead of Editing Style.css – Instead of modifying the parent theme’s
style.css, add custom styles in the WordPress Customizer > Additional CSS. - Check the Theme’s Update Log – Some premium themes provide changelogs detailing what files are affected in each update. Reviewing these logs can help you avoid overwriting crucial modifications.
If your WordPress customizations were lost after an update and you don’t have a backup, check with your hosting provider—they may offer automatic backups that can restore your site to a previous version.
Plugins Conflicting with Theme Customizations
Sometimes, installing a new plugin can break your site’s design or functionality. This happens when a plugin’s scripts or styles conflict with your theme’s existing code.
How to Identify and Resolve Plugin Conflicts
- Deactivate All Plugins – Go to Plugins > Installed Plugins, deactivate all plugins, and check if the issue resolves.
- Reactivate One by One – Enable each plugin individually and check for conflicts. When the issue reappears, you’ll know which plugin is causing it.
- Switch to a Default Theme – Temporarily switch to a default WordPress theme like Twenty Twenty-Four. If the problem persists, it may be a WordPress core or plugin issue rather than the theme itself.
- Use a Plugin Conflict Checker – The Health Check & Troubleshooting plugin allows you to troubleshoot issues without affecting your live site.
Customizations Not Displaying Properly
You might notice that changes made in the WordPress Customizer, CSS edits, or theme file modifications don’t appear on the live site. This can happen due to caching issues, incorrect code, or conflicts between styles.
Troubleshooting Steps
- Clear Your Cache – Caching plugins may store old versions of your site. Clear your cache and refresh the page.
- Use Incognito Mode – Open your site in an incognito/private browser window to check if changes are visible.
- Check for CSS Conflicts – If custom CSS isn’t applying, add
!importantto override existing styles:
CSS
h1 {
    color: red !important;
}
- Ensure Proper File Editing – If you edited theme files via FTP, confirm that the changes were uploaded correctly and are in the correct child theme folder.
- Disable CDN Caching – If you’re using a CDN like Cloudflare, purge the cache to reflect new changes.
Pro Tip: When to Hire a Developer for Advanced Troubleshooting
If an issue persists despite troubleshooting, it may require custom development. Consider hiring a WordPress developer if:
- You need extensive customization beyond your technical skills.
- The problem involves PHP errors or complex backend code.
- The theme update caused unexpected layout issues.
With the right troubleshooting approach, you can quickly resolve issues and ensure your WordPress theme customization runs smoothly. Now, let’s explore best practices to maintain your customized theme effectively.
Conclusion
Customizing a WordPress theme is a powerful way to create a unique website that aligns with your brand, improves user experience, and enhances SEO. Whether you’re making simple adjustments in the WordPress Customizer, using plugins for added functionality, or modifying theme files through a child theme, following best practices ensures that your changes remain secure and effective.
Throughout this guide, we’ve covered everything from how to customize WordPress theme safely to troubleshooting common issues and optimizing for mobile responsiveness. The key to successful WordPress theme customization is balancing creative design with performance and security. Start small, test changes before applying them live, and always keep backups to prevent data loss.
If you’re looking to elevate your client’s website design and functionality, consider partnering with White Label Agency. Specializing in WordPress website development, we offer custom solutions tailored to your specific needs. Our WordPress outsourcing services include design, development, and ongoing maintenance, ensuring your site remains updated and secure.
With a team of over 100 experienced WordPress developers, we provide reliable and efficient solutions to help your business thrive online. Contact us today and discover how we can assist you with our WordPress theme customization service.
FAQs
Can I switch themes after customizing my current one?
Yes, but customizations made directly to a theme (e.g., modifications to style.css or functions.php) will not carry over. If you’ve used a child theme, some modifications may still work with a compatible parent theme.
Will customizing my theme affect my website’s speed?
It depends. If you add excessive plugins, large images, or unoptimized code, it can slow down your site. Always prioritize performance optimization, such as caching and image compression, when customizing.
Is it safe to customize my theme without coding knowledge?
Yes! The WordPress Customizer, page builders like Elementor, and plugins make it easy to modify themes without touching code. However, for advanced changes, using a child theme and backing up your site is recommended.
What happens to my customizations when I update my theme?
If changes were made directly to theme files, they will be overwritten. To avoid this, always use a child theme or apply custom CSS via the WordPress Customizer.