Intro
New to the WordPress world? Or you know some, but want to fill up some gaps? This tutorial will explain the process of converting an HTML site to a custom WordPress theme from start to finish and will help you to kickstart your career as a WordPress developer.
As Aristotle once said, “For the things we have to learn before we can do them, we learn by doing them”. This guidebook is all about practical knowledge — we will take a pre-made HTML template and at the end, we’ll get a fully functioning WordPress website. You’ll get a healthy dosage of theory too, don’t worry.
Why is WordPress so popular? The answer is simple, it’s just so convenient to use! It is free, it has thousands of ready to use plugins and templates, a user-friendly interface and it’s extremely versatile.
It can be found everywhere, from the site of your favorite local pizza place as well as Forbes and the New York Times. Did you know that Beyonce’s official site is WordPress? As well as more than a half of all CMS-driven websites online? If it’s good for Queen B, it’s good for everyone.
And the great thing about WordPress – it’s really flexible. If you go further than buying premium themes, you can do a lot of fun custom stuff there. To find out more about the difference between premium and custom themes, check out this article.
This Guide though is for that “fun custom stuff”, so let’s kick it off!
Background
Before we start, it’s important to note that knowledge of HTML, CSS, and JavaScript is necessary. A basic understanding is sufficient to be able to get through this guidebook, but the WordPress market is extremely competitive, so you better be very good at those in the future.
Prior PHP knowledge is not necessary. You will get enough insight from this guidebook alone, so you will be able to create your own custom WordPress themes. But definitely, if you’re planning to be a real WordPress expert, PHP is something you should master. Same goes for working with MySQL databases.
So without further ado…
What You Need

WordPress. Well, duh! Download it from here and let’s move on.
Local Server. WordPress operates on PHP, a server-side scripting language, which needs a server to be executed. With tools like MAMP or, it’s Windows counterpart, WAMP setting up a virtual server is fairly easy. Please follow this guide for MAMP.
Or this one for WAMP.
Text Editor. It’s enough to use Microsoft Notepad, but since we’re not that hardcore, we’ll use a text editor for developers. Sublime Text is a popular choice, but you can choose whatever your heart desires.
Checklist:
- Download WordPress
- Install and set up local server environment
- Choose and download Text Editor
Preparation

Create a Folder for Your Project
First, we have to find a directory where we will store our WP files. You can do it in the preferences of your local server. For example MAMP:
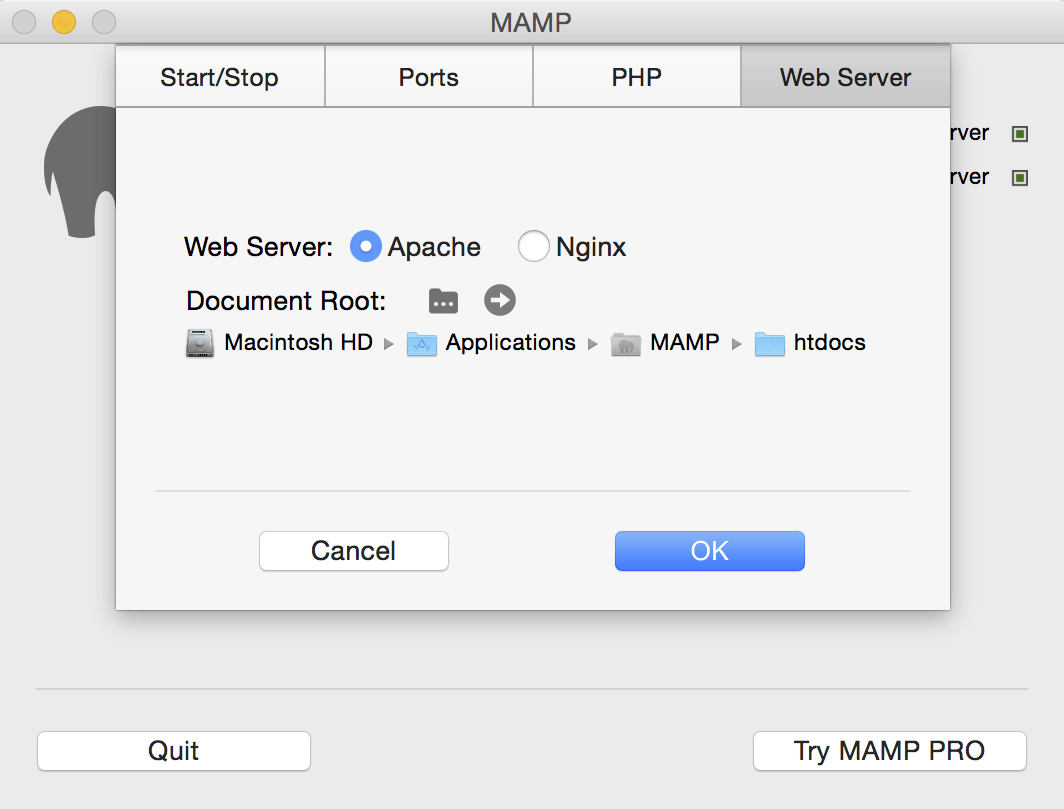
There you create a folder for your project, give it a name and move all files inside the WordPress folder there.
Create a Database
Now it’s time to create a database. Make sure your local server is running and go to https://localhost:8888/phpMyAdmin.
NOTE: Or if you have older versions of MAMP just click Open WebStart page and find the link to phpMyAdmin there on the page.
Ok, now all we need in PHPMyAdmin is to create a database for our project. Nothing is easier than this. Just click Databases > Create database. Give it a name and hit the create button. Done!
Installation
Now let’s go back to the folder with our project. Find wp-config-sample.php file. Open it and enter the name of your database as a ‘DB_NAME’ parameter. For DB_USER and DB_PASSWORD type ‘root’
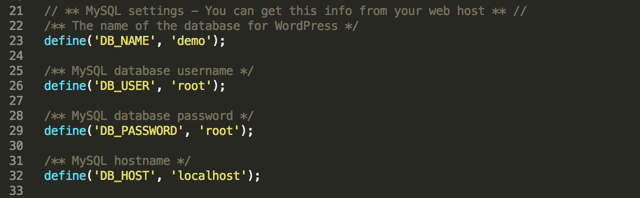
You can also change table_prefix from ‘wp_’ to something else. It’s better for security.
Find the field DEBUG and type TRUE there. This way you’ll be able to see whether there are PHP errors/warnings in your code. We’ll change it back to FALSE before moving it to the live version since no one else needs to know about your blunders (just kidding, your code will be perfect).
Save your file as wp-config.php in the very same directory.
Open your website and enter: https://localhost:8888/your-project-name/, you’ll see this window.
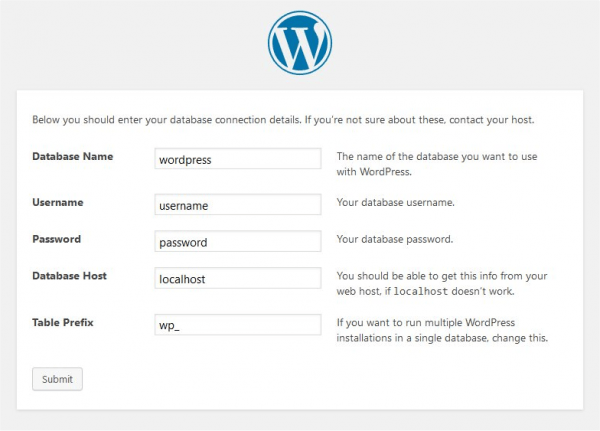
First, we connect our database with our WordPress instance.
On the next step, choose your language, email, login, and password to enter dashboard and make sure the last field about allowing your website to appear in search engines is unchecked.
Voila! We have a functional WordPress site from the box. Granted, it doesn’t have much (and by “much” I mean anything). But you have a state of art dashboard on your hands and tons of themes, plugins and widgets to choose from.
But we didn’t come here to build WordPress sites with pre-existing themes, did we? We won’t go the route of laziness, instead we will be creating our own themes. Fully customized and a hundred times better. Eventually.
Creating a Custom WordPress Theme
In your project’s folder go to wp-content then themes and create there a folder with the name of your theme. It can be the same as the name of your project (it usually is).
Now before doing anything else we need to decide whether to use a starter theme. A starter theme is usually your starting point for building a custom theme, it already has a needed file structure and some ready to use features. It will serve as a foundation for your theme.
Talking about Foundation, one of the most popular starter themes is FoundationPress, that’s based on widely famous frontend responsive framework Foundation. Here’s a good article on why you should use a starter theme and some good suggestions for which one to use.
But for now, we’ll stick to our original plan by building all from scratch to get a clearer understanding.
To be functional, a WordPress theme needs to have style.css and index.php files.
style.css will contain information about your theme.
index.php will be responsible for your page markup.
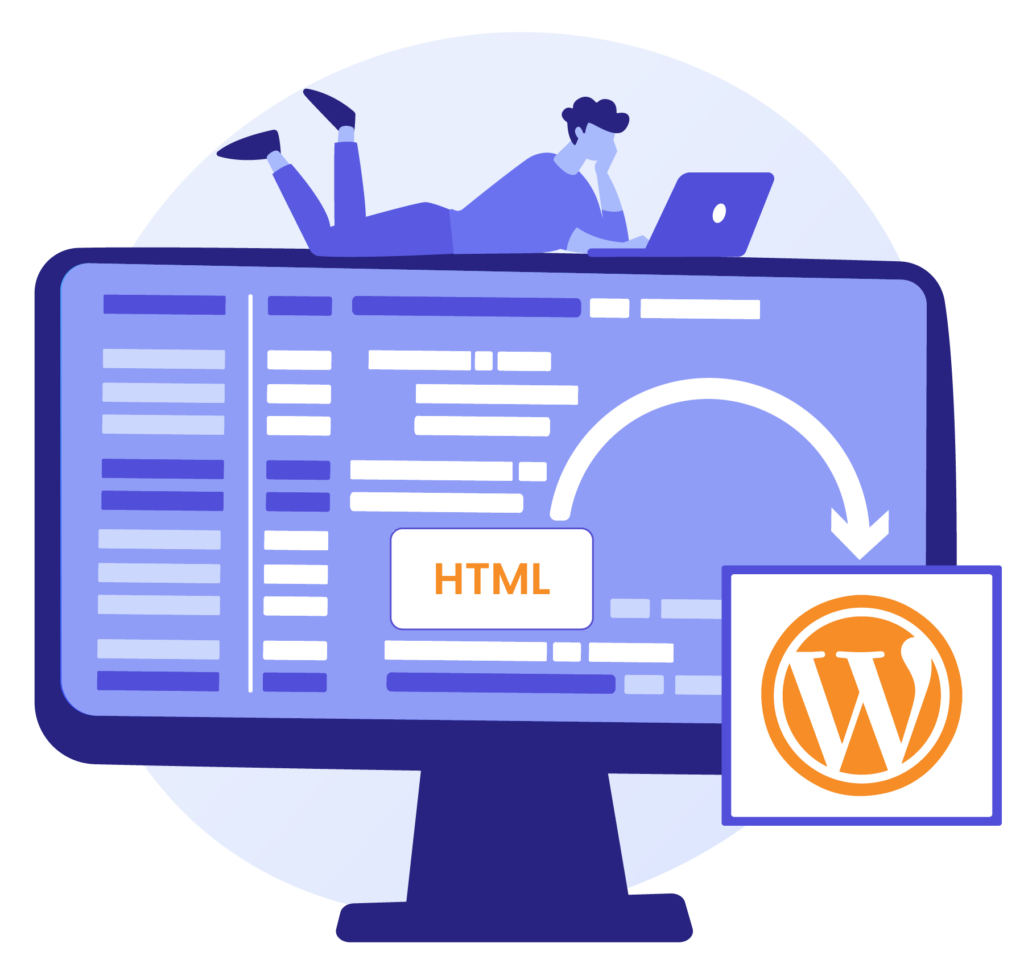
HTML to WordPress
Usually, you’ll create a theme from a PSD file, but to make things easier for ourselves, we’ll take a ready-made HTML template and make a WordPress theme out of it.
You can download it from here.
Move all files inside your theme folder.
We have 3 pages: Home (index.html), Blog and Contact. Rename them so they have .php at the end instead of .html. Also, add style.css file and fill out theme name, your name and the description of your theme there in a format like below.

Okay, so we have index.php and style.css files already, so that means that technically we already have a WordPress theme. Enter the dashboard and go to Appearance – Themes. In the list of available themes, you should see your theme. Activate the theme. And here we can mark our preparation phase as done.
Was easy, right?
Checklist:
- Create a folder for your project
- Create a database
- Install WordPress
- Create a folder for your theme
- Add Index.php and style.css files
- Download project files
Development
Applying CSS and js files

The first thing you will notice is that CSS files didn’t load properly and we have a page in plain HTML. That’s because our default path to the CSS (app.css) file is incorrect now.
If you look at the code:
[format code="html"]<link rel="stylesheet" type="text/css" href="css/app.css">[/format]
it’s trying to load the file app.css from your-site/css/app.css since that was the original path in our HTML-template. But we have a more complicated structure and the right path should be:
href=”your-site/wp-content/themes/your-theme/css/app.css”
One of the main things you need to remember is that every file that you’re trying to load should be done dynamically and that’s where PHP comes into play.
In your theme’s folder create a new file — functions.php. In this file, we’ll define functions that will add functionality to our theme. And the first thing we do is register our CSS file (and the js file as well while we’re at it).
[format code="php"]
function wl_styles(){
    wp_enqueue_style('main-style', get_template_directory_uri() . '/css/app.css');
    wp_enqueue_style('responsive-style', get_template_directory_uri() . '/css/media-query.css');
}
add_action('wp_enqueue_scripts', 'wl_styles');
[/format]
How does it work? Inside a php tag we create a new function wl_styles() (wl for white label – although could be named anything) and inside of it we declare a WordPress function wp_enqueue_style.
wp_enqueue_style has a bunch of parameters. We need only two of those: $handle — name of the stylesheet and $src — path of the stylesheet.
For $handle we write ‘main-style’ or whatever you want basically. But make sure all the names you give for functions, variables etc. make sense (and not only to you).
For $src we’ll use this line:
get_template_directory_uri() . ‘/css/app.css’
get_template_directory_uri() is another function (yes, we have a function inside a function which is inside another function) it will retrieve the right path for our theme directory as a string. ‘/css/app.css’ is our path inside our theme directory and it is also a string. With a dot, a concatenation operator, between them we connect the two and have the complete path to our stylesheet.
And we do the same for the media-query.css file, the one that responsible for responsiveness.
Then we add action to connect our function to wp_enqueue_scripts hook. Action and hooks are big reasons for what makes the WordPress so great, but we will talk about them in future editions.
We’ll add our only javascript file the same way, but use wp_enqueue_script function instead.
[format code="php"]function wl_scripts(){
    wp_enqueue_script('main-js', get_template_directory_uri() . '/js/script.js', '', '', false);
}
add_action('wp_enqueue_scripts', 'wl_scripts');[/format]
NOTE: the difference between wp_enqueue_script and wp_enqueue_scripts is huge. First is a function and latter is a hook.
So as of now, your functions.php file should look like this:
[format code="php"]
function wl_styles(){
    wp_enqueue_style('main-style', get_template_directory_uri() . '/css/app.css');
    wp_enqueue_style('responsive-style', get_template_directory_uri() . '/css/media-query.css');
}
add_action('wp_enqueue_scripts', 'wl_styles');

function wl_scripts(){
    wp_enqueue_script('main-js', get_template_directory_uri() . '/js/script.js', '', '', false);
}
add_action('wp_enqueue_scripts', 'wl_scripts');[/format]
Now go back to index.php file and before closing </head> tag add this function:
<?php wp_head() ?>
wp_head is one of those functions that are must-have for any theme you create. It triggers the wp_head action.
Now if you save all the changes and enter your site again, you’ll see that stylesheets are loading just fine.
Great job, champion!
Dividing the Page into Parts
For the website we’re building now, header and footer look exactly the same on all pages. And that will be the case for most websites you’ll do. Since copy-pasting all the code that displays a header and a footer onto all of our pages sounds like a complete waste of our time, we’ll move both pieces to two separate files: header.php and footer.php.
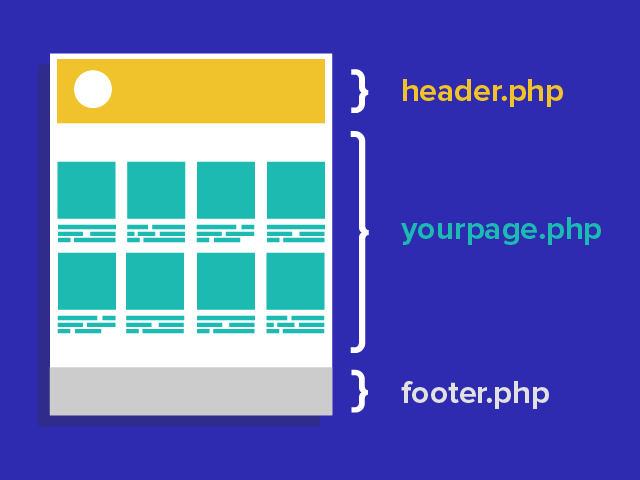
Go back to our index.php file and move all the HTML code from the top to the closing </header> tag to our newly added header.php file.
And also move all the markup starting from opening <footer> tag until the very end of the footer.php file.
Just before the </body> tag you should add
<?php wp_footer(); ?>
function. This function will trigger wp_footer hook, which is essential for your theme. Most plugins that you’ll be installing will use this hook to connect their additional js files to. It also adds an admin bar for the live preview of your site.
Now we need to connect all the parts into one. Move back to index.php and before all the markup add
<?php get_header() ?>
function. And at the bottom —
<?php get_footer() ?>
That’s how all our pages should start and end. So go on and delete the same pieces for all the other pages as well.
Data Management
In a WordPress theme, nothing should ever be hardcoded. All the data should be pulled from the database. A good example is a title of our page. Right now we have it written like this:
<title>White Label Agency</title>
And all our pages will be titled like that. The only way to access the data will be through the code on each template. We need to change it to this:
[format code=”html php”]<title><?php wp_title(‘|’, true, ‘right’) ?><?php bloginfo(‘name’) ?></title>[/format]
wp_title function will display the title of our site (White Label Agency). bloginfo(‘name’) will give us the name of a particular page (Blog, Contact, etc.). For more details check this article.
And since title tag is located inside our header.php file, it will work for every single page.
Adding Pages
Time to move back to our dashboard. Go Pages – All Pages. There’s one Sample page that is empty and absolutely useless. You’re free to delete it. We need 3 pages: Home, Blog, and Contact add them by clicking Add New.
NOTE: If you’re adding pages that will be displayed in the menu, an easier way will be to:
Appearance – Customize – Menus – Add Menu – Add items – in the Pages tab enter the name of the page in the Add New Page field – click add. Then repeat for a new page.
Next step will be to apply our templates to their respective pages. Now we have contact.php and blog.php template files, we need to add home.php as well and copy all the content of index.php file there. We’ll leave index.php file as it is for now and will come back to it later.
To make our pages visible as templates in the dashboard, we need to add a small piece of code to home.php like in the screenshot below. You can choose whatever name you like, but as was said before, make sure all your names make at least some kind of sense.
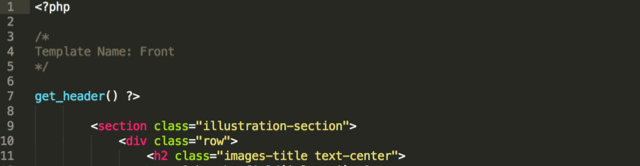
Now after adding that line, go check your pages in the dashboard and you will see an option to apply the template to that page.
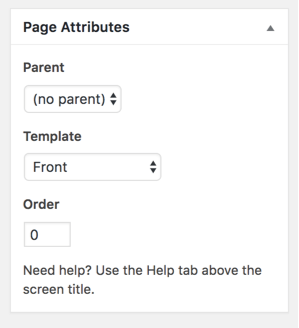
Our front page is done, but it is accessible via https://your-site/home/ URL. So technically it is not a front page of our website. To make it so, we will go to Dashboard – Settings – Reading and for a front page displays we will select a static page and will set it to Front.
Menu
So we have our pages set up but our menu is still not working. Thankfully with WordPress setting up a menu is a piece of cake.
First, we need to register our menu in the function.php file. Just like for most things in WordPress, there’s a function for that — register_nav_menu( $location, $description ). The first parameter is an identifier and the second one is the name of the menu in the dashboard.
So… add this line register_nav_menu( ‘main’, ‘Main Menu’ ); to your function.php file.
Now back to dashboard and we can see “Menus” option in the “Appearance” section. Go there and adjust the menu.
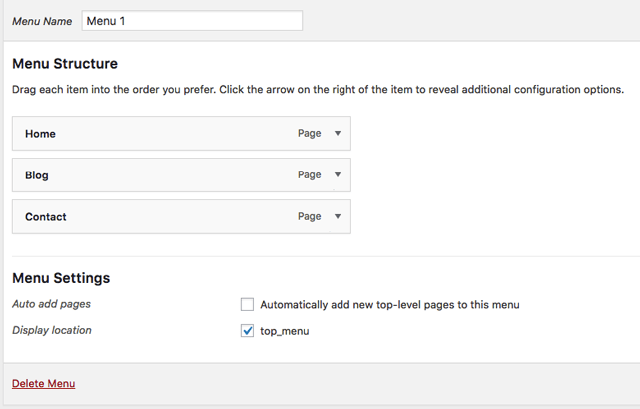
We’re halfway there. Now go to header.php file and find the menu there. It’s hardcoded now. Delete the <ul> tag (but copy it’s class name) and everything inside of it. Now add:
[format code="php"]wp_nav_menu(array(
'theme_location'=&gt;'main',
'menu_class'=&gt;'top_menu_list',
'container'=&gt;false
)
);[/format]
Where ‘theme_location’ is the name of our identifier from register_nav_menu( ‘main’, ‘Main Menu’ ). ‘Menu_class’ is the name of the class for <ul> tag (the one we copied). And ‘container’ will determine whether you need to wrap your menu in <div> tag (we don’t).
Note: wp_nav_menu has a lot of parameters besides those 3, but all are optional. You can read about them here.
Save all and check.
Now it’s possible to add/remove/edit new pages in the menu from the dashboard. And it’s extremely easy as well!
Custom Fields
The whole purpose of WordPress is to make all content editable from the dashboard. That’s why custom fields exist and that’s why Advanced Custom Fields should be the first plugin you install for your website.
NOTE: Custom fields is a default functionality for WordPress, so you don’t have to install the plugin. WordPress Codex has a detailed explanation on how to set it all up manually. It is however rather time-consuming and won’t give you much benefit apart from boosting your self-esteem a little bit (might be worth it for this fact alone). Also if you need to use some advanced custom field types (like a repeater or a map), that will turn into such a pain in your bottom half…
Go to Plugins – Add New and start typing Advanced Custom Fields. Install and activate it.
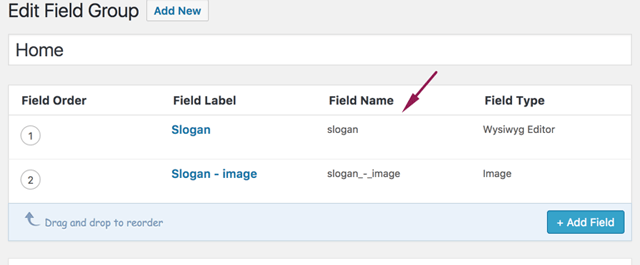
You need to ask yourself what content should be editable. Most of the time, the answer is all of it. Let’s take a look at our front page again. We have some headings, some small paragraphs, and background images. We’ll skip our header section for now and move to the second section with “Your Design. Our Code. Your Label” slogan hanging there.

There are two elements that we can turn into custom fields: the slogan and the picture below it.
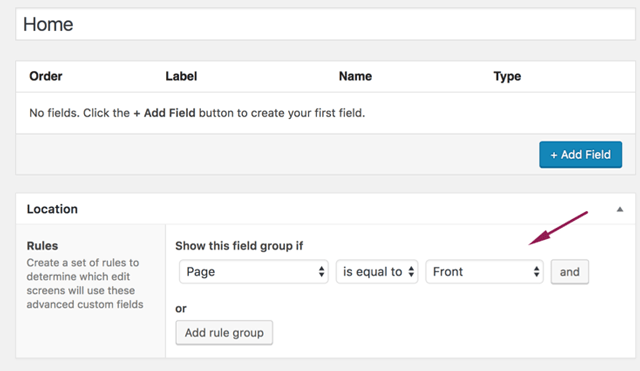
Going back to the dashboard, there’s a Custom Fields option. Click Add New field group. It’s up to you how you want to structure your fields. It is however important that any particular group will be applicable to a certain set of rules.
Under the Location heading, you can set those rules. Now in our case, we can apply our fields to “page is equal to front” or “page template is equal to front”, since our template (front) will be used only for this specific page(home) so either will work for us.
We can apply the rules, so field group will work for all pages, all posts, specific post, or specific category etc. You can write your custom rules as well. Read about all the features here:
For this example, we will make one group for all custom fields within the Home page. Now let’s add a custom field for a slogan. You can see that some words there are in bold, so it’s better to use Wysywig as a field type, so the user can have an editor to play around the formatting.
Next is an image at the bottom of a section. Field type is an Image.
Going back to our Home page in the dashboard we can see that at the bottom of a page there are those two fields that we added. Fill it with a content. You can take the image from the folder you downloaded before.
To display the content of our custom fields on the page we’ll need to dive into our code again and change a few things. Find the section with the slogan and delete everything that’s inside the h2 tag. And insert this line: <?php the_field(‘slogan’); ?> where ‘slogan’ is your field name.
All text type custom fields are set up exactly like the above.
For images, it’s practically the same but with a little twist. If you look at the code, you’ll see that our image is displayed as a background and the path to it is coded in the CSS. It’s forbidden to insert PHP code inside the external CSS file, but there is a way around it.
We will take css lines that are responsible for the background: background: url(../image/all.png) no-repeat; background-size: contain; -webkit-background-size: contain; and will add it to our html code as an inline css.
So it will look like this:
[format code=”html”]<div class=”text-center png-images” style=”background: url(image/all.png) no-repeat; background-size: contain; -webkit-background-size: contain;”></div>[/format]
Now we have full access to manipulate the background image using php.
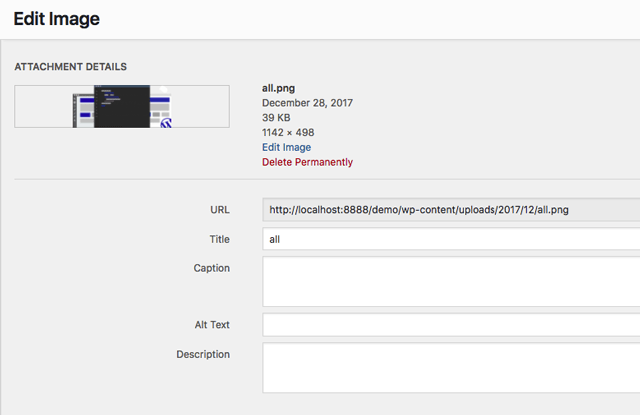
The best way to display a custom image field is to return it as an array. Every image contains some information about itself. Like caption, title, alt text and description. All of them are editable from the dashboard, so we need to have access to all of them.
NOTE: in our case, the image is a background and you don’t really need to have alt text etc. for it, so the basic display would have been sufficient:
<?php the_field(‘image’); ?>
But for regular images, always remember that you need to have access to all that extra information about the pic. So an array type is a way to go.
So the code will be as follows:
<?php $image = get_field(‘slogan_-_image’); ?>
We’re getting access to our field and assign it to a variable
[format code=”html”]<div class=”text-center png-images” style=”background: url(<?php echo $image[‘url’]; ?>) no-repeat; background-size: contain; -webkit-background-size: contain;”></div>[/format]
We’re displaying parameter ‘url’ of our field. You can display alt text the same way, just use ‘alt’ parameter:
<?php echo $image[‘alt’]; ?>
And that’s really it. Seems easy, right? That’s because it totally is!
Options Page and the Repeater
While ACF gives you a lot of great free functionality, some of its main features you need to buy ACF Pro license. Two of the premium features we’ll talk about in this section.
What is the Options page and why do we need it?
Before we added custom fields that worked only on one particular template. But sometimes you need to create custom fields that will be accessible globally (i.e. for all pages, templates or posts).
As you remember, our header and footer will remain the same for all pages on our website. So we will create an Options page on the dashboard and will store all the custom fields for them there. So assuming you’ve got an ACF Pro activated, add this line of code to your function.php file below everything you had before:
[format code="php"]if( function_exists('acf_add_options_page') ) {
    acf_add_options_page();
}[/format]
After saving, you can go back to wp dashboard and see “Options” in the menu.
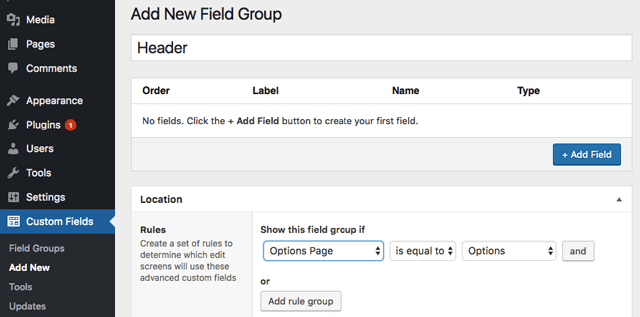
So now we have a location for our custom fields and we can start creating them. Go to Custom Fields and create a new Field Group – Header.
As a location rule we need to pick Options Page from the dropdown:
For our header, we need to make 4 elements into custom fields: logo, heading and two links (start a project and see our services).
You already should know how to set up custom fields for a logo (img) and heading (wyzwig). The only difference here is that to display the content of custom field located on the Options page, you need to pass ‘option’ as a parameter to the_field function. So for heading it will be:
<?php the_field(‘header_title’, ‘option’); ?>
The same logic applies for a logo as well.
With the two links, it’s a little different, since we want the admin of the site to have an option whether to add one link, two (as it is now), three or more. That’s where the Repeater feature comes in to play.
A repeater will allow you to add as many records of the same type as you need. Let’s see how it works in practice.
So let’s go back to our Custom fields menu and for the Header group and let’s create a new field – Header Links. Chose Repeater as a field type and you’ll notice a new block – Sub Fields.
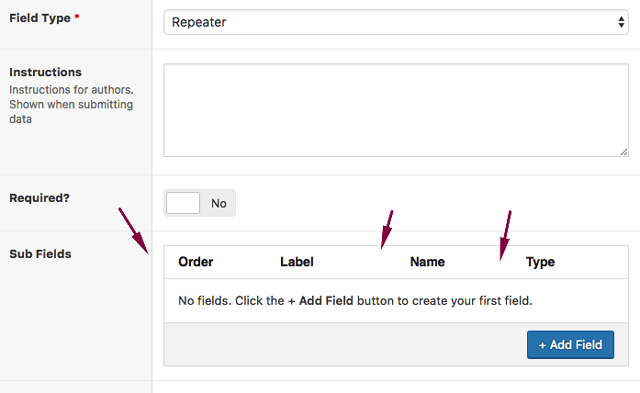
Sub fields work the same as regular fields. For our links, we need to add one custom sub field for a text of the link and one for the link itself.

Notice the page link type for a custom link – URL. Page link type will work as a dropdown listing all pages there are on the website, so user can easily change links from the dashboard.
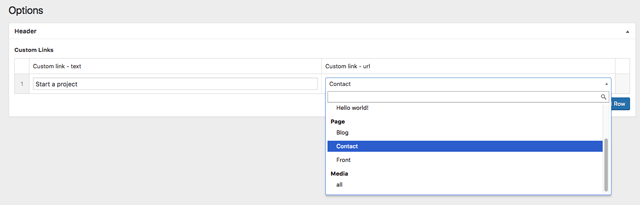
So now in the Options Page, we have Custom links field with the option to add new rows. Each row is our link (with text and URL).
Displaying a repeater field is slightly more difficult, but nothing to be afraid of.
Here’s the code from the official ACF documentation:
[format code="php"]// check if the repeater field has rows of data
if( have_rows('repeater_field_name') ):
  // loop through the rows of data
  while ( have_rows('repeater_field_name') ) : the_row();
    // display a sub field value
    the_sub_field('sub_field_name');
  endwhile;
else :
  // no rows found
endif;[/format]
First we check whether our repeater has any records (rows). If yes, we start looping through the records.
Now let’s apply the above code to our page. Open Header.php file and find the piece of code responsible for displaying our links.
In the end it should look like this:
[format code="html php"]<!-- PHP: First we check whether the Repeater field actually exist -->
<?php if( have_rows('custom_links','option') ): ?>
  <div class="row">
    <div class="home-header-buttons">
      <!-- PHP: now we loop through each item of the repeater -->
      <?php while ( have_rows('custom_links','option') ) : the_row()?>
        <!-- PHP: Inside we display fields of the repeater. Notice the use of the_sub_field instead of the_field -->
        <a href="<?php the_sub_field('custom_link_-_url') ?>" class="header-button">
          <span>
            <?php the_sub_field('custom_link_-_text') ?>
          </span>
          <span class="arrow_icon">
          </span>
        </a>
      <!-- PHP: loop ends here -->
      <?php endwhile; ?>
    </div>
  </div>
  <!-- PHP: if statement ends here-->
<?php endif; ?>[/format]
You now can add as many links as you want from the dashboard.
Now do that for the social media buttons in the footer.
Tip: we need a repeater with two sub-fields: social media icon and social media link.
[format code="html php"]<?php if( have_rows('socials','option') ): ?>
  <ul class="social">
    <!-- PHP: now we loop through each item of the repeater -->
    <?php while ( have_rows('socials','option') ) : the_row()?>
      <!-- PHP: Inside we display fields of the repeater. Notice the use of the_sub_field instead of the_field -->
      <?php $social_icon = get_sub_field('socials_icon') ?>
      <li>
        <a href="<?php the_sub_field('socials_link') ?>">
          <span class="icon icon_facebook" style="background: url(<?php echo $social_icon['url']; ?>) no-repeat;"></span>
        </a>
      </li>
      <!-- PHP: loop ends here -->
    <?php endwhile; ?>
  </ul>
  <!-- PHP: if statement ends here-->
<?php endif; ?>[/format]
And there you have it. Our homepage made the successful transition from being a static HTML page to a WordPress theme.
Things We Learned

- How to install WordPress
- What is the theme template hierarchy
- How to divide the page into templates
- How to add menu
- How to work with Custom Fields
This is the end of the first part. Join me for part two where we will convert Blog and Contact page to WordPress and talk about The Loop, Custom Post Types, Forms and how to add a map.
Until then, take care!