- Types of Caching in WordPress
- Why and When to Clear Your WordPress Cache
- How to Clear Browser Cache
- How to Clear Cache Using WordPress Caching Plugins
- Clearing Server-Side Cache
- Clearing CDN Cache
- Automating Cache Management
- Common Issues and Troubleshooting
- Best Practices for Cache Management
- Master Cache Management for a Faster, Smarter WordPress Website
Caching plays a pivotal role in optimizing the performance of a WordPress website. Simply put, caching is the process of storing frequently accessed data temporarily so that it can be quickly retrieved without the need to regenerate it. In the context of WordPress, this means storing elements like web pages, scripts, and images, which helps to improve load times and reduce server strain.
The importance of caching for website performance cannot be overstated. By implementing a proper caching strategy, WordPress site owners can significantly enhance user experience, improve SEO rankings, and handle higher traffic volumes without compromising speed. However, there are times when you need to clear the WordPress cache to address issues like outdated content or conflicting updates.
If you’ve ever encountered problems such as not seeing changes made to your site or experiencing unexpected errors, an outdated cache might be the culprit. Learning how to clear WordPress cache effectively ensures your website functions smoothly and displays the most up-to-date information to visitors.
In this guide, we’ll explore the fundamentals of caching, walk you through the steps to delete WordPress cache using various methods, and help you troubleshoot common caching issues to keep your website running at its best.

Types of Caching in WordPress
Caching in WordPress involves multiple layers, each playing a crucial role in optimizing your website’s performance. Understanding these types of caching will help you identify how to clear WordPress cache when necessary and ensure your site functions efficiently.
1. Browser Cache
Browser caching refers to the process where web browsers temporarily store static content like images, CSS, and JavaScript files locally on a user’s device. This allows the browser to load these elements faster during subsequent visits, reducing server requests. However, an outdated browser cache can sometimes prevent users from seeing updates on your site. Knowing how to clear WordPress cache, including browser cache, ensures visitors always see the latest version of your website.
2. Server-Side Cache
Server-side caching occurs directly on the hosting server and stores dynamically generated pages and data as static files. This reduces the time it takes for the server to process requests and deliver content to visitors. Popular server-side caching mechanisms include object caching, database caching, and opcode caching. If your hosting provider offers built-in caching, they typically provide tools to clear WordPress cache from the server when updates are made.
3. Plugin-Based Cache
Caching plugins are a common solution for WordPress users to implement and manage caching effortlessly. These plugins create and store static versions of your web pages, reducing the load on your server and speeding up content delivery. Tools like WP Rocket, W3 Total Cache, and LiteSpeed Cache allow you to configure caching settings and provide options for how to clear WordPress cache directly within the plugin’s interface.
4. Content Delivery Network (CDN) Cache
A Content Delivery Network (CDN) stores cached copies of your website’s content on servers located around the globe. When a user visits your site, the CDN delivers the cached content from the server closest to their location, significantly improving load times for international visitors. If you update your site and notice old content being displayed, clearing the CDN cache ensures users receive the most current version of your pages.
Each caching type serves a unique purpose, but an outdated cache can sometimes cause issues like displaying old content or conflicting with updates. By learning how to clear WordPress cache across these layers, you can maintain a fast website for your visitors.
WordPress Outsourcing Services
Enhance your agency’s capabilities with our WordPress outsourcing services. Get expert development, design, and maintenance support tailored to your needs.
Why and When to Clear Your WordPress Cache
Clearing your WordPress cache is essential for maintaining an optimized and up-to-date website. Cached content can significantly improve performance, but it may occasionally cause issues that impact your site’s display or functionality. Understanding why and when to clear WordPress cache ensures your visitors have the best experience possible.
1. Ensuring Updates and Changes Are Visible
One of the most common reasons to delete WordPress cache is to ensure that recent updates or changes to your website are visible to users. Whether you’ve updated a theme, added new content, or adjusted your site’s design, cached versions may display outdated elements, confusing visitors. Learning how to clear WordPress cache ensures that changes are immediately reflected across all devices and browsers.
2. Troubleshooting Display or Functionality Issues
Outdated cache can sometimes lead to unexpected display errors or functionality issues. For example, a plugin update may conflict with cached data, causing layout problems or broken features. If you encounter such issues, clearing the cache is often one of the first troubleshooting steps. By clearing WordPress cache, you can eliminate these problems and verify whether they’re caused by caching or other factors.
3. Regular Maintenance Schedules for Cache Clearing
Incorporating cache clearing into your regular website maintenance schedule is a proactive way to avoid potential problems. Over time, cached data can become bloated, slowing down your site instead of improving its performance. Regularly clearing the cache ensures that your website remains fast, responsive, and free from outdated data. Many caching plugins and hosting providers allow you to automate this process, making it easy to keep your site running smoothly.
By knowing how to clear WordPress cache, you can ensure your site remains up-to-date, resolve common issues efficiently, and maintain peak performance. Whether you’re making updates, troubleshooting errors, or performing routine maintenance, clearing your cache is a crucial step in optimizing your WordPress website.
How to Clear Browser Cache
Clearing the browser cache is a simple yet effective way to ensure that your visitors see the most up-to-date version of your WordPress site. If your changes aren’t appearing or you’re troubleshooting an issue, clearing the browser cache may help. Below are step-by-step guides for clearing the cache in popular web browsers.
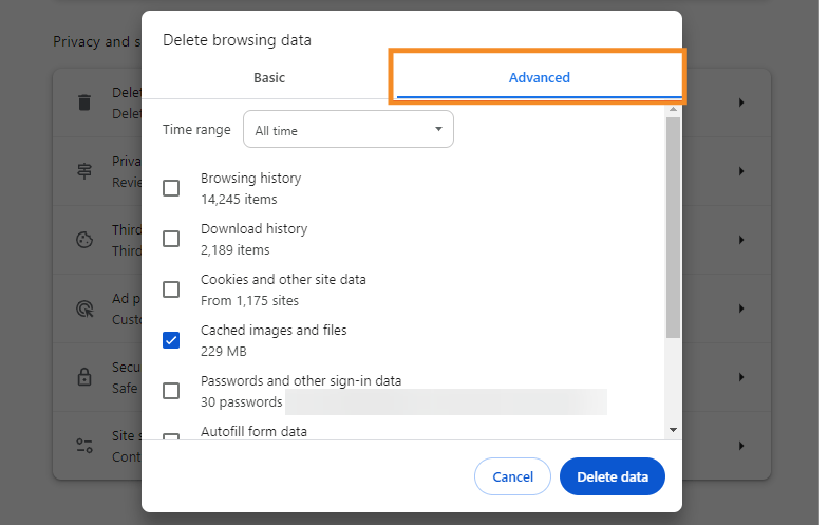
1. Google Chrome
- Open Google Chrome and click the three-dot menu in the top-right corner.
- Navigate to More Tools > Clear Browsing Data.
- In the pop-up window, select the Time Range (choose “All time” for a complete clear).
- Check the box for Cached images and files.
- Click Clear data to clear the cache.
Tip: After clearing the cache, refresh your WordPress site to ensure the updated content loads properly.

2. Mozilla Firefox
- Open Mozilla Firefox and click the three-line menu in the top-right corner.
- Go to Settings > Privacy & Security.
- Under the Cookies and Site Data section, click Clear Data.
- Check the box for Cached Web Content and click Clear.
- Restart your browser and visit your WordPress site to verify the cache has been cleared.
3. Safari
- Open Safari and click Safari in the top menu bar.
- Select Preferences and navigate to the Privacy tab.
- Click Manage Website Data, then click Remove All.
- Confirm by clicking Remove Now.
- Refresh your WordPress site to see the updated changes.
Note: Safari cache clearing is particularly important for troubleshooting display issues on macOS devices.

4. Microsoft Edge
- Open Microsoft Edge and click the three-dot menu in the top-right corner.
- Navigate to Settings > Privacy, Search, and Services.
- Under Clear browsing data, click Choose what to clear.
- Select Cached images and files and set the Time Range to “All time.”
- Click Clear now to complete the process.
Pro Tip: Clearing the browser cache in Edge is often necessary for Windows users experiencing outdated content on their WordPress site.
Clearing the browser cache complements steps to clear WordPress cache stored on the server or in plugins, ensuring your site delivers updated content across all devices.
How to Clear Cache Using WordPress Caching Plugins
WordPress caching plugins are a powerful way to optimize your site’s performance, and they make it easy to clear WordPress cache when needed. Here’s a detailed guide on how to clear cache using popular caching plugins, along with brief overviews of other tools.

1. WP Rocket
WP Rocket is a user-friendly premium caching plugin that simplifies cache management. Here’s how to clear the cache:
- Log in to your WordPress dashboard.
- Navigate to Settings > WP Rocket.
- Under the Dashboard tab, click the Clear Cache button.
- For a deeper clean, go to the Tools tab and click Preload Cache to regenerate cached files.
Tip: WP Rocket automatically clears cache when you make significant changes, but manual clearing ensures immediate updates are visible.
Tip: WP Rocket automatically clears cache when you make significant changes, but manual clearing ensures immediate updates are visible.
2. W3 Total Cache
W3 Total Cache offers robust caching features for advanced users. To delete WordPress cache:
- In your WordPress dashboard, go to Performance.
- Click on Dashboard in the W3 Total Cache settings.
- Locate and click the Empty All Caches button.
- Verify that the cache has been cleared by refreshing your website.
Note: Use the Purge Cache option for specific sections like page cache or object cache if needed.

3. WP Super Cache
WP Super Cache is a popular plugin for static caching. Here’s how to clear the cache:
- Access your WordPress dashboard and go to Settings > WP Super Cache.
- Under the Easy tab, click the Delete Cache button.
- For advanced options, go to the Advanced tab and choose specific cache types to clear.
Tip: After clearing the cache, test your site to confirm updates are live.

4. LiteSpeed Cache
If your hosting provider supports LiteSpeed, this plugin is an excellent caching solution. Follow these steps:
- Log in to your WordPress dashboard and go to LiteSpeed Cache.
- Navigate to the Dashboard tab.
- Click the Purge All button to clear the entire cache.
- For selective clearing, use options like Purge By Page or Purge By URL in the Manage tab.
Pro Tip: Clearing LiteSpeed cache also ensures compatibility with updated content when using a Content Delivery Network (CDN).
5. Other Popular Plugins
In addition to the plugins above, here are quick steps for clearing cache in other popular tools:
- Hummingbird: Go to Hummingbird > Caching and click Clear Cache.
- Cache Enabler: Navigate to Settings > Cache Enabler and select Clear Cache.
- SG Optimizer (SiteGround): Access SiteGround Tools in your hosting account and clear the cache via the Caching tab.
Each plugin provides a unique set of features, so refer to their official documentation for detailed instructions.
By learning how to clear WordPress cache using these plugins, you can ensure your website remains up-to-date, fast, and free from common caching issues.
Clearing Server-Side Cache
Server-side caching plays a critical role in improving your WordPress site’s speed and performance. However, when changes to your site are not visible, clearing server-side cache becomes necessary. Here’s how to clear WordPress cache using hosting dashboards, cPanel, and command-line methods.
1. Managed WordPress Hosting Providers
Many managed WordPress hosting providers offer built-in caching solutions with simple tools to clear the cache. Here are steps for some popular hosting providers:
- Log in to your WP Engine user portal.
- Select the WordPress site you want to manage.
- In the left-hand menu, click Caching.
- Click the Clear All Caches button to remove cached content.
- Log in to your SiteGround account and access the Site Tools for your website.
- Navigate to the Speed > Caching section.
- Click the Flush Cache button under Dynamic Cache or Memcached to clear specific cache layers.
Pro Tip: Managed hosting dashboards often offer options to automate caching settings, but manual clearing ensures immediate updates.
2. Using cPanel
If your hosting provider uses cPanel, you can clear server-side cache directly through its interface:
- Log in to your hosting cPanel account.
- Navigate to the Cache Management section (varies by host, often labeled “Caching” or “Cache Manager”).
- Select the specific cache type you want to clear (e.g., dynamic cache or opcode cache).
- Click Clear Cache or a similar button to complete the process.
Tip: If your cPanel includes access to caching plugins like LiteSpeed Cache, you can manage and clear cache from within the plugin interface.
3. Command Line Methods (For Advanced Users)
For advanced users comfortable with SSH, clearing server-side cache through the command line provides precise control:
- Use an SSH client (e.g., Terminal, PuTTY) to log in to your server.
- Navigate to your WordPress installation directory.
- Run the following commands based on your caching setup:
- Clear NGINX Cache:
sudo rm -rf /var/cache/nginx/* - Clear Varnish Cache:
varnishadm ban "req.url ~ /" - Clear Memcached: Use tools like
memflushortelnetcommands to clear cached objects.
- Clear NGINX Cache:
- Restart your web server if necessary:
sudo systemctl restart nginxorsudo systemctl restart apache2
Note: Always back up your site and ensure you have the proper permissions before using command-line methods.
By learning how to clear WordPress cache at the server level, you can resolve issues related to outdated content, ensure your site runs smoothly, and provide visitors with the most current version of your website.
Clearing CDN Cache
A Content Delivery Network (CDN) caches your WordPress site’s static content across multiple servers worldwide, ensuring fast load times for users regardless of location. However, outdated CDN cache can sometimes cause issues like displaying old content. Learning how to clear WordPress cache from your CDN is essential for keeping your site updated and performing well.

1. Cloudflare
Cloudflare is one of the most popular CDN providers for WordPress. Here’s how to purge your cache in Cloudflare:
- Log in to Your Cloudflare Dashboard
Access your Cloudflare account and navigate to the site you want to manage. - Go to the Caching Section
Click on Caching in the top menu. - Purge Individual Files or Everything
- For specific files: Use the Custom Purge option and enter the URLs you want to clear.
- For all cached content: Click Purge Everything to remove the entire cache.
- Verify Your Site
After clearing the cache, refresh your site to ensure the updated content is displayed.
Tip: Cloudflare allows you to set cache expiration rules and enable development mode to bypass the cache temporarily while making changes.
2. Other CDN Providers
For other CDN services, the steps to clear the cache are generally similar. Here’s a quick guide:
- Log in to your KeyCDN dashboard.
- Navigate to Zones > Manage Zone.
- Select Purge Cache to clear cached content for that zone.
- Access the AWS Management Console.
- Go to CloudFront Distributions and select your distribution.
- Create an invalidation request by entering the paths of cached files or using /* to clear everything.
Considerations for Clearing CDN Cache
- Always test your site after purging cache to ensure updates are live.
- Use the custom purge option to clear specific files instead of the entire cache, when possible, to minimize performance disruptions.
- If your CDN integrates with your WordPress caching plugin, clearing the plugin cache may automatically purge the CDN cache.
By understanding how to clear WordPress cache on CDN platforms like Cloudflare and others, you can resolve outdated content issues and ensure your site delivers fast, up-to-date pages to your visitors worldwide.
WordPress maintenance plans
WordPress Maintenance Plans ensure site security, performance, and uptime. Choose custom plans with backups, monitoring, and unlimited content edits.
Automating Cache Management
Manually clearing the cache can be time-consuming, especially for busy WordPress site owners or developers managing frequent updates. Automating cache management ensures your site remains up-to-date without sacrificing performance. Here’s how to streamline the process while learning how to clear WordPress cache automatically.
1. Setting Up Automatic Cache Purging After Content Updates
Many caching plugins and hosting providers offer automatic cache purging options that clear the cache whenever you make significant changes to your site, such as updating posts, pages, or plugins.
- Using Caching Plugins:
- WP Rocket, W3 Total Cache, and LiteSpeed Cache allow you to enable automatic cache purging in their settings.
- For example, in WP Rocket, go to Settings > Cache and enable options like Clear cache for updated content.
- Hosting Dashboard Integrations:
- Managed WordPress hosting providers like WP Engine and SiteGround automatically clear WordPress cache when changes are detected.
- Check your hosting dashboard to ensure automatic purging is enabled.
2. Configuring Cache Expiration Times
Setting appropriate cache expiration times (TTL, or Time to Live) ensures cached content remains fresh without frequent manual intervention.
- Browser Cache Expiration:
- Configure browser cache headers using caching plugins or server settings.
- For instance, set images and static files to expire after 30 days to balance performance and freshness.
- In plugins like W3 Total Cache, navigate to Browser Cache settings and adjust expiration rules.
- CDN Cache Expiration:
- CDNs like Cloudflare and KeyCDN allow you to configure cache TTL for different file types.
- Shorter TTL is ideal for frequently updated content, while longer TTL is suitable for static assets like images.
3. Best Practices for Balancing Performance and Freshness
Automating cache management requires a balance between maintaining high performance and ensuring fresh content delivery. Follow these best practices:
- Enable Smart Purging:
Only clear the cache for updated content instead of purging everything, which can reduce server strain. Many plugins and hosting providers offer selective cache-clearing options. - Test Changes in Development Mode:
Before making updates live, enable development mode in your caching plugin or CDN to preview changes without caching interference. - Monitor Cache Performance:
Regularly review your site’s performance metrics to ensure caching automation doesn’t negatively impact load times or content updates.
By automating cache management and understanding how to clear WordPress cache effectively, you can save time, improve your website’s performance, and ensure visitors always see the latest content.

Common Issues and Troubleshooting
Caching can greatly enhance your WordPress site’s performance, but it can also cause certain issues if not managed properly. Below, we address common problems, their causes, and steps to resolve them effectively while learning how to clear WordPress cache to ensure smooth functionality.
1. Changes Not Appearing After Clearing Cache
This is one of the most common caching issues and occurs when updates to your site aren’t visible despite clearing the cache.
Causes:
- Browser cache still holds outdated content.
- CDN cache or server-side cache hasn’t been purged.
- Incorrect plugin settings prevent complete cache clearing.
Solution:
- Clear WordPress cache at all levels: browser, plugin, CDN, and server-side.
- Verify the changes in an incognito browser window or after a hard refresh (Ctrl+F5 or Cmd+Shift+R).
- If the issue persists, disable caching temporarily to confirm it’s the source of the problem.
2. Site Layout Issues Due to Cached CSS/JS Files
Cached CSS or JavaScript files may conflict with updated versions, leading to broken layouts or unresponsive functionality.
Causes:
- Old CSS or JavaScript files are being served instead of the updated versions.
- Minification or combination settings in caching plugins are causing conflicts.
Solution:
- Clear plugin and CDN cache to remove outdated files.
- Check caching plugin settings for CSS/JS minification and disable it temporarily.
- Add a version number to CSS and JS files (e.g., style.css?v=1.1) to force browsers to load the updated files.
3. Error Messages Related to Caching Plugins
Caching plugins may occasionally trigger error messages, especially after updates or conflicts with other plugins/themes.
Causes:
- Plugin compatibility issues.
- Incorrect file permissions or server settings.
- Corrupted cache data.
Solution:
- Deactivate the caching plugin and check if the issue is resolved.
- Update the plugin to the latest version or revert to a previous stable version.
- Check server logs for errors and ensure proper file permissions are set.
- If necessary, switch to a different caching plugin.
4. Steps to Diagnose and Resolve Caching-Related Problems
To troubleshoot and resolve caching-related problems effectively:
- Identify the Level of Caching: Determine whether the issue is with browser cache, plugin cache, CDN cache, or server-side cache.
- Clear Cache in a Step-by-Step Manner: Start with the browser, then plugin, CDN, and server, testing after each step.
- Disable Caching Temporarily: If the problem persists, disable caching altogether to confirm its role in the issue.
- Enable Debugging Logs: Use plugin debugging features or WordPress debugging to identify specific errors related to caching.
- Consult Support: If errors persist, contact your hosting provider or caching plugin support for assistance.
By addressing these common issues and understanding how to clear WordPress cache effectively, you can ensure your site delivers consistent and optimized performance without disruptions.
Best Practices for Cache Management
Effective cache management is key to maintaining a fast, responsive, and up-to-date WordPress site. Following these best practices ensures smooth operations and minimizes caching-related issues while optimizing performance.
1. Regularly Updating and Testing Caching Plugins
Keeping your caching plugins up-to-date is crucial for security, compatibility, and performance improvements.
- Update Plugins Regularly: Outdated caching plugins may lead to vulnerabilities or compatibility issues with newer WordPress versions. Check for updates in your WordPress dashboard under Plugins and ensure they are installed promptly.
- Test Changes in a Staging Environment: Before enabling new caching features or updates, test them in a staging environment to avoid disruptions on the live site.
- Review Plugin Configuration: Periodically revisit your caching plugin settings to ensure they align with your current site’s requirements and traffic patterns.
Tip: Plugins like WP Rocket and W3 Total Cache offer robust documentation and support, making it easier to manage updates and configurations effectively.
2. Monitoring Website Performance and Adjusting Caching Strategies
Caching strategies should be tailored to your site’s unique needs and adjusted based on performance monitoring.
- Use Performance Monitoring Tools: Tools like Google PageSpeed Insights, GTmetrix, or Pingdom can help track your site’s speed and identify areas for improvement.
- Adjust Cache Expiration Rules: Set cache expiration times that balance performance with content freshness. For instance, frequently updated blogs may need shorter cache durations than static pages.
- Analyze Traffic Patterns: Use tools like Google Analytics to understand visitor behavior and adjust caching settings to handle peak traffic efficiently.
Pro Tip: Combine caching with a Content Delivery Network (CDN) for optimal performance, especially for international audiences.
3. Educating Site Editors and Administrators on Cache Implications
Cache management isn’t just for developers – site editors and administrators should also understand how caching works and how to clear WordPress cache when necessary.
- Train Team Members: Educate team members on common caching issues, such as outdated content or layout problems, and how to resolve them.
- Provide Documentation: Create a simple guide outlining when and how to clear WordPress cache using plugins, hosting dashboards, and CDNs.
- Communicate During Updates: Inform site editors when major updates are made that may require cache clearing to ensure everyone is on the same page.
By adopting these best practices, you can ensure your WordPress caching strategy is robust, flexible, and easy to manage. Regular updates, performance monitoring, and team education will help you maintain an optimized website that delivers the best experience to your visitors.
Master Cache Management for a Faster, Smarter WordPress Website
Effective cache management is a cornerstone of maintaining a fast, reliable, and user-friendly WordPress website. By understanding the different types of caching and knowing how to clear WordPress cache, you can address common issues like outdated content, layout problems, or functionality errors, ensuring your visitors always have the best experience.
Implementing the practices outlined in this guide – whether it’s clearing cache through plugins, hosting dashboards, CDNs, or automating cache management – can significantly improve your site’s performance. Regular monitoring, updating caching tools, and educating your team will help you stay ahead of potential caching challenges.
Struggling with cache management or other WordPress challenges? Let the White Label Agency handle it for you! Our expert WordPress services cover everything from optimization to maintenance, ensuring your site performs at its peak. Contact us today to learn how we can help you elevate your WordPress website!