You love your WordPress powered website. Maybe it’s old enough to contain thousands of articles, pages and media files. But what if something goes wrong?
If the server which hosts your website crashes tomorrow, can you retrieve your WordPress website without losing anything?
This question is important, and to answer yes, you should know about backups. Fortunately, if you don’t know how to backup your WordPress website, you’ve come to the right place.
Why Is Backing up WordPress Important?
Before learning the basis of backing up WordPress, it is important to talk about why you should care about doing this and why you should have backups of your website. This is actually independent of your choice of using WordPress – whatever your website is built with, you should always have regular backups.
Backing up your website allows you to retrieve a working version if something goes wrong or something is done that breaks it. Several things can break a website: a server crash, an external attack, an error happening during an update, or even human error.
More often, you are not responsible of errors occurring on the server you use and, just as you are human and can make mistakes, the people managing your server can, too.
These errors can be severe, where all or a part of your website is altered: you can lose articles, photos, videos, or you can even lose access to your website. That’s surely not a thing you want, and that’s why backing up your website is important.
In fact, if a problem occurs, with backups, you can restore the altered files and data. Depending on how often you back up, you can even retrieve your whole website, without losing anything.
The frequency of your backups is a choice you must do by yourself, depending on the frequency of your updates: if you post fifty articles a day, you will want to back up more often than if you post once a month.
How to Back up WordPress
As with many websites, a WordPress website is separated into two parts: files and a database. Both are important: without files, there is no website, and without database, there is no data, that’s why you must back up your files and your database.
Backing up the WordPress Files
What Are They and Why Back Them up
Files are the core of WordPress. They contain functions called to execute the right action at the right moment: publishing a post, commenting on an article or listing the tags, for example.
If you lose your WordPress files, you can retrieve them by downloading a brand new archive from WordPress.org for example, except for some of them: those which are stored into the wp-content subdirectory and yourwp-config.php file at the root of your installation.
The wp-config.php file contains information about your database and eventually other personalized options, so it can’t be replaced by a default one: you must back it up!
The wp-content directory contains your installed plugins and themes and your media files: images, videos or audio files you upload in WordPress are stored here. The other directories are common to all WordPress installations, but your wp-content directory is personal and unique.
Even if the other files can be retrieved with an official archive, backing up them is not useless: by not downloading a new installation again, you gain time and can re-upload your whole website as soon as possible.
How to Perform a Complete Backup
You should have an FTP/SFTP client to access your web hosting. Thanks to this software, you can download all your WordPress files into a folder on your computer. If it is the first time you back up your installation, you should just download the whole WordPress folder.
But if it is not the first time, you can gain time by just downloading the files you created or modified since the last time you backed up. To do that, you can for example verify the date the files were last updated, or you can use the power of WordPress.
Most of the time, you will only have to download your media files, unless you installed a new plugin or modified your theme. By default, WordPress sorts your media files by year and month: if you backed up your website last month, you don’t have to download older media files, so you can avoid downloading whole folders!
That’s for the manual way, but you can find specialized software to synchronize a folder on your computer and another on your web hosting: automatically it will download the whole folder the first time and only the new or updated files the other times.
Backing up the WordPress Database
What Is It and Why Back It up
The ‘database’ is the place where you can find your data: when you create a post or a page, add metadata to a media file or again when a user leave a comment on your website, it is stored into the database. But that’s not all: your database also contains the options you set in your administration, users’ information or even your plugins’ settings.
Like your media files, what is stored in your database is personal and you won’t be able to retrieve it if you don’t have any backup: in case of losing part or all your data, you must be able to send it again to retrieve your whole website.
How to Back It up
WordPress uses several tables to store your data and settings. By default, these tables have the prefix wp_ to be recognizable.
If you want to be sure to retrieve your whole website without the need to set your options, you’ll need to back up all of these tables, but you can also choose those that are the most important for you.
For example, the table wp_posts contains all the posts you write and wp_postmeta stores their meta data. We find the same scheme with wp_users and wp_usermeta for the users registered on your website, or withwp_comments and wp_commentmeta for the comments. Your categories and tags data are stored into the tableswp_terms, wp_term_relationships and wp_term_taxonomy. Other tables have a clear name, likewp_links or wp_options.
The way we can back up our database can change depending on the web hosting used. However, chances are great that your web hosting allows you to use ‘phpMyAdmin’ to control and manage your database. Since phpMyAdmin is one of the most widespread applications for managing MyQSL databases, I’ll show you how to use it to manually back up a database.
The way we access phpMyAdmin is different depending on the web hosting. Generally, configuration panels are split into different parts and phpMyAdmin can be retrieved in the one that concerns your database(s).
Before seeing our database(s), phpMyAdmin asks us to login with a username and password. You can retrieve these by contacting your web hosting if you lose them. Note that this step can be skipped on certain web hosting, as you are already logged in on your configuration panel.
Once you are logged in, if you have several databases, you can choose the one that contains your WordPress data by selecting it in the left panel. Then, you will see the list of the tables forming your database.
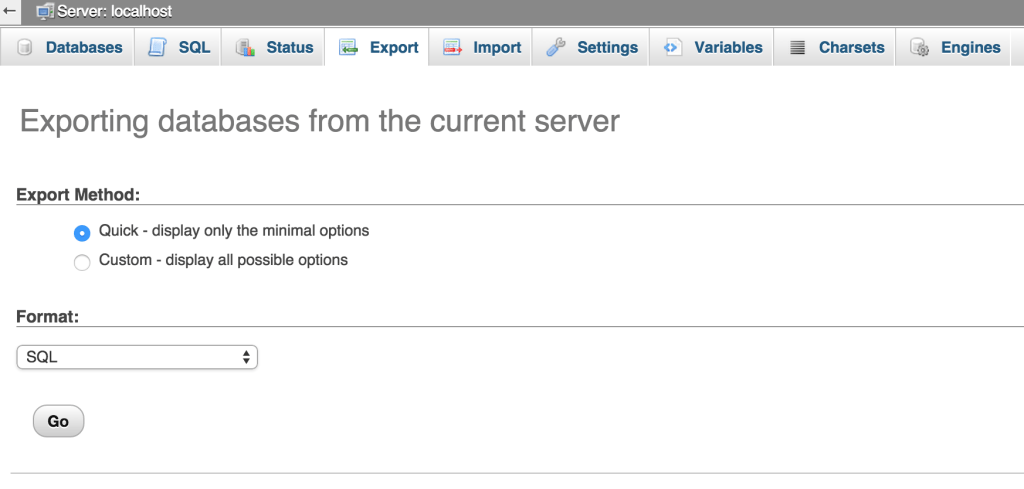
Above this list, you can see some tabs. Click on the one labelled Export. The screen you see now depends on the version used by your web hosting.
You should be able to see two methods: ‘Quick’ and ‘Custom’. The former is only interesting if your website is young, with a few articles. However, if you have many posts, the generated file will be too big, and the second method would then be preferred.
A list allows you to select the tables you want to export. For example, if you haven’t had any new users since the last time you backed up your website, there is no need to export the table wp_users.
You can choose to get an output as text but this is only useful if you want to copy and paste this data somewhere. We will instead prefer the default option: ‘Save output to a file’. You can then choose a personal name and some options, but the default ones are good. Unless you have a specific need, you should choose the SQL format.
The options are now separated into three parts. In the first one, you can choose to ask for a comment in the file that will for instance include the backup time. At the end of this part, be sure to chose exporting ‘structure and data’ to get your tables structure (their columns) and their data (their rows).
The second part is for the structure of your tables. You can ask for the addition of a line that will create the database if needed, or for a protection that will create the tables only if they don’t exist yet. The last part is for the data, with an option to truncate the table before inserting your saved data, for example.
Once your options are chosen, hit the ‘Go’ button to generate a file containing your database. The time taken to perform this action will vary depending on the size of your database.
How to Restore WordPress from a Backup
Backing up your website is a good thing, but if you don’t know how to use these backups to restore your website, it is not very useful. Seeing now how to restore your website is important, as if something goes wrong on your server you will need to act fast to limit the damage.
Restoring the WordPress Files
The first part of WordPress we will restore is its files, as without them the database is useless. The way you will restore your files will depend on the way you backed them up.
If your backup contains all the files, including the WordPress core, then you can upload all of them at the one time. If not, you must download a WordPress archive before sending it to your server. Don’t forget to replace thewp-config-sample.php file by your own wp-config.php file you backed up. Then, upload your plugins and themes, then your media files.
If you have a lot of media files and must send all of them, you can send them gradually by, for example, uploading the latest ones first, restoring your database, then uploading the ones you didn’t send, in order to have a working version of your website as soon as possible, even without all your images.
Restoring the WordPress Database
To restore our database, we will use phpMyAdmin again. After choosing your database, go to the Import tab where you will find a Browse button to send your previously generated file.
Note that your file must be an SQL one, but it can be compressed with ZIP, GZIP or BZIP2. This is useful if your database has an important size. Depending on the maximal size allowed for the uploads on your server, splitting your backup into several parts can be mandatory.
In Conclusion
In this article we’ve covered the manual way to back up WordPress files and database. You can, however, find tools which can be more or less useful depending on your use of WordPress. In addition to specialized software, maybe your web hosting offers you regular backups. Moreover, you can find plugins which will back up your data automatically.
Note that backing up your files doesn’t mean your data is secured: you can still lose your data on your server and the backup on your computer. That’s why you should always store your backups in several places like your computer and a external hard drive for instance.
Backing up your data is important if you want to restore your website in case there’s a problem. Note that this article was centered around WordPress but you can easily adapt it for every other website, depending on the files and tables you really need, those which are regularly updated.